2021年12月15日 星期三

取代 window resize 事件? 如何使用 ResizeObserver 偵測元素變化

ResizeObserver 用來監控元素大小的變動,與 window 的 resize 事件(如下)的用途相似,通常用在監控瀏覽器視窗大小的變動。ResizeObserver 使用範圍更廣,可以綁在 HTMLElement 上。

window.addEventListener('resize', callback);

首先要建立一個 ResizeObserver 物件

const resizeObserver = new ResizeObserver(callback);

callback 是定義當指定的元素偵測到變化時,需要執行的動作,分為:

  • entries:型態為陣列(array)。因為允許偵測多個變動元素,每個元素變動的大小、位置等資訊,會以 ResizeObserverEntry 物件裝在陣列內。
  • observer:ResizeObserver 物件本身
const resizeObserver = new ResizeObserver((entries, observer) => {
    entries.forEach(entry => {
        // Do something to each entry
        // and possibly something to the observer itself
    });
});

再來,使用 oberve()開始監看元素

resizeObserver.observe(target, options);

target為需要偵測的元素


unobserve() 取消追蹤指定的元素

resizeObserver.unobserve(target);

可以使用disconnect()取消所有元素的追蹤

resizeObserver.disconnect();

接著,請參考 window resize 事件的範例,範例將視窗大小顯示,若resize發生時,將異動更新到畫面上,如果使用 ResizeObserver 要怎麼改寫:

<p>Resize the browser window to fire the <code>resize</code> event.</p>
<p>Body height: <span id="height"></span></p>
<p>Body width: <span id="width"></span></p>
const heightOutput = document.querySelector('#height');
const widthOutput = document.querySelector('#width');
  
const resizeObserver = new ResizeObserver(entries => {
  entries.forEach(entry => {
    heightOutput.textContent = entry.contentRect.height;
    widthOutput.textContent = entry.contentRect.width;
  });
});

resizeObserver.observe(document.querySelector('body'));

Resize the browser window to fire the resize event.

Body height:

Body width:


底下實作一個範例,用slider控制 div 區域的寬度,當增測的 div 變化時,依據寬度的數值改變 div 背景的透明度。

See the Pen ResizeObserver Example by chenuin (@chenuin) on CodePen.


參考資料: https://developer.mozilla.org/en-US/docs/Web/API/ResizeObserver

2021年10月1日 星期五

如何將 Github 專案部屬到 Heroku (Creating a 'Deploy to Heroku' Button)

先前「[django] 將Django專案部署到Heroku」提到如何一步一步建立 Django 專案,並部屬到 Heroku。若是Github現有的專案已經滿足 Heroku 基本所需的設定,可以透過網頁操作,將現有專案快速地複製到 Heroku 上。

操作說明使用 heroku-startup-settings 這個專案 ,可以到 Github 查看完整的程式碼。首先,Github專案必須在根目錄先建立 app.json 這個檔案:

{
  "name": "Heroku startup settings",
  "description": "Getting started with Django project",
  "repository": "https://github.com/chenuin/heroku-startup-settings",
  "logo": "https://node-js-sample.herokuapp.com/node.png",
  "keywords": ["heroku", "python", "django"]
}
(app.json)

內容很好理解,檔案沒有必填的欄位,通常會寫namedescriptionlogo有助於其他人理解這個專案的內容或目的,更多的設定可以參考 app.json schema

其中設定環境參數 env 應該是最常使用的,可以依照需求調整部屬。


app.json 正確建立後,就可以開啟這個連結。
https://heroku.com/deploy?[REPO_WEB_URL]/tree/[BRANCH_NAME]
請替換專案的路徑和分支名稱,因此連結為:

接者可以在 README.md 新增這段文字,
[![Deploy](https://www.herokucdn.com/deploy/button.svg)](https://heroku.com/deploy?template=https://github.com/chenuin/heroku-startup-settings/tree/master)

請記得替換成自己的連結,按鈕效果就像這樣:

Deploy

點選按鈕開啟連結並填寫專案名稱,按下「Deploy app」,就會自動在 Heroku 建立一個一樣的新專案。


相關文章:

[django] 將Django專案部署到Heroku

參考資料:

https://devcenter.heroku.com/articles/heroku-button https://devcenter.heroku.com/articles/app-json-schema

2021年8月17日 星期二

Github Actions 自動 Jekyll 專案部屬 Github Pages

自從完成「Travis CI 自動 Jekyll 專案部屬 Github Pages 完整範例」很久沒有更新 Github Pages,近期上傳時卻發現CI執行失敗,並不是腳本有問題或編譯過程有錯誤,而是request被拒,所以即使換了Github Token依舊無法解決。

直到我發現 Travis CI 帳戶設定突然多了「Plan」,有免費的方案可以選擇,選擇之後再讓Job重跑居然就成功了,所謂的免費方案是給 10000 available credits,每次執行Job時就會扣點直到用完為止,之後可以一次性購買或者選擇月費方案。


Github Actions 是 Github 內建的功能,可以定義Repo自動化、執行CI/CD相關工作,因此決定將 Travis CI 的功能由 Github Actions 取代,以下將說明如何移除 myblog 原本 .travis.yml 的設定 ,以 Github Actions 自動部屬至 Github Pages。


一、選擇 Workflow 建立方式

方法一:

在專案根目錄

新增目錄 .github/workflow/,並在 workflow/ 新增副檔名為 .yml的檔案。

方法二:

到 Github repo上設定

可更改檔名和底下的內容


二、新增 Workflow

name 命名,可自行決定名稱

name: website

on 必填的設定,Github Action提供各種事件供選擇觸發時機,這邊設定為 push 時執行,也可以針對多個事件指定分支。

# Triggered when code is pushed to any branch in a repository
on: push


# Or ....
on:
  # Trigger the workflow on push,
  # but only for the main branch
  push:
    branches:
      - main

jobs 接下來是最重要的部分,workflow是由一個或多的Job組成,預設情況下會同時執行,每個 Job 必須給一個唯一的 job_id,是由數字、字母或 _- 組成的字串,且字首只能由字母或是 _。因此我們第一個發布 - publish 的動作:

jobs:
  publish:

再來是 publish 內需要哪些設定:

runs-on 必填的設定,使用哪種機器執行 workflow,像是 Ubuntu、macOS、windows server等 Github 提供的虛擬環境。

runs-on: ubuntu-latest

steps 定義有哪些任務,Job 由一連串的任務組成,可以替任務命名,會在 Github 上顯示。


uses 指定動作(Action),通常是一些重複性的執行動作,被打包成一個套件,可以在這裡直接使用,更多相關的套件可以到 Github marketplace 搜尋 。底下使用的是checkout一個新的分支並安裝Ruby。

steps:
  # Reference the major version of a release
  - uses: actions/checkout@v2   # Downloads a prebuilt ruby
  - uses: ruby/setup-ruby@v1

run 在虛擬機器 shell 上執行 command-line

steps:
  - run: bundle install
  - run: chmod +x ./script/cibuild
  - run: ./script/cibuild

with 執行動作時可以加入參數,利用 github-pages 可以快速設定,我們指定將網站部署到 chenuin/chenuin.github.io 這個 repo 的 master 分支,需要上傳的目錄為 ./_site ,也就是Jekyll編譯好的檔案目錄。

steps:
  - uses: crazy-max/ghaction-github-pages@v2
    with:
      repo: chenuin/chenuin.github.io
      target_branch: master
      build_dir: ./_site
    env:
      GITHUB_TOKEN: ${{ secrets.GH_PAT }}

env 這裡分為 GITHUB_TOKENGH_PAT兩種,前者不需要任何設定、僅限於同一個 repo 內的操作,後者則是部署到其他 repo 使用的。(說明)

GH_PAT 設定方式,請先至 Settings => Developer settings => Personal access tokens (或下方連結),按右上角新增Token,scopes 可直接勾選 repo 並將Token複製。

https://github.com/settings/tokens


再到專案的 Settings => Secrets => Actions (或下方連結),按右上角新增,命名 GH_PAT 並將剛剛複製的Token貼上。

https://github.com/[USER_NAME]/[REPO_NAME]/settings/secrets/actions

關於 GITHUB_TOKEN 可以看這部影片了解更多:


完整檔案如下:

name: website

on: push

jobs:
  publish:
    runs-on: ubuntu-latest
    steps:
      - name: Checkout
        uses: actions/checkout@v2
      - name: Set up Ruby
        uses: ruby/setup-ruby@v1
        with:
          ruby-version: 2.6
      - name: Install dependencies
        run: bundle install
      - name: Before srcipt
        run: chmod +x ./script/cibuild
      - name: Srcipt
        run: ./script/cibuild
      - name: Deploy to GitHub Pages
        if: success()
        uses: crazy-max/ghaction-github-pages@v2
        with:
          repo: chenuin/chenuin.github.io
          target_branch: master
          build_dir: ./_site
        env:
          GITHUB_TOKEN: ${{ secrets.GH_PAT }}

檔案異動內容已經上傳至 Github ,可點選連結查看。


三、查看執行結果

https://github.com/[USER_NAME]/[REPO_NAME]/actions


相關文章:

參考連結:


2021年8月15日 星期日

CloudCannon 支援 Jekyll 網站後台管理CMS系統

With CloudCannon as your Jekyll CMS, you will have all the tools you need to create amazing static websites.

CloudCannon 是線上網站後台管理CMS系統,可以作為 Jekyll、HUGO等後台管理,除了提供圖形化操作介面新增文章,自動發布、排程的設定,也有免費的網域名(Domain) .cloudvent.net供即時瀏覽。

先註冊或使用 Github/Gitlab/Bitbucket 帳號登入,可以匯入已有的專案並支援雙向的同步,現在馬上開始!


輸入專案名稱:


選擇Github的同步的專案及分支:


編譯類型為Jekyll,其他安裝、編譯參數也在這邊設定。


完成後,可以看到後台。


這個測試網站是公開的,可以加上 Settings => Authentication 改用帳密登入。更多功能請參考 CloudCannon 官方文件

2021年8月14日 星期六

Html 轉 Figma 的小工具 Figma Plugin匯入現有網站


Figma 如何匯入現有網站,可以使用 Figma to HTML, CSS, React & more! 快速解決!

可以先安裝 google chrome 的擴充功能、Figma的擴充功能,再到網站使用 google chrome 的擴充功能匯出 Json,並到 Figma 將檔案匯入。

成果雖然會和實際網站有些差別,但很方便。


Figma的擴充功能
https://www.figma.com/community/plugin/747985167520967365/Figma-to-HTML%2C-CSS%2C-React-%26-more!

google chrome 的擴充功能
https://chrome.google.com/webstore/detail/html-to-figma/efjcmgblfpkhbjpkpopkgeomfkokpaim


操作方式:


2021年8月9日 星期一

[Vue.js] 如何建立 Vue3 + webpack5 專案範例

以下說明如何使用 webpack5 打包 Vue3 專案,若尚未安裝 webpack5,可以參考「webpack5 安裝及基礎教學」。


一、安裝

需要安裝的套件如下,特別需要注意的是,在 Vue3 裡支援副檔名 .vue 的 single-file components 的套件,從 vue-template-compiler 變成 @vue/compiler-sfc

  • vue
  • @vue/compiler-sfc
  • vue-loader
  • webpack
  • webpack-cli


請先新增專案,並在目錄內新增 package.json,並 npm 執行安裝。

{
  "name": "vue3-webpack5-template",
  "version": "1.0.0",
  "description": "vue3-webpack5-template",
  "private": true,
  "scripts": {
    "build": "webpack"
  },
  "author": "chenuin",
  "license": "ISC",
  "devDependencies": {
    "@vue/compiler-sfc": "^3.1.5",
    "vue-loader": "^16.1.2",
    "webpack": "^5.49.0",
    "webpack-cli": "^4.7.2"
  },
  "dependencies": {
    "vue": "^3.1.5"
  }
}

執行指令安裝:

npm install


二、設定打包的設定檔

首先針對 Vue 專案所設定的,Loader 可分為testloader,前者是定義哪些檔案需要處理,像這裡就是副檔名為 .vue 的檔案;後者則是使用哪一個套件處理 :

module: {
    rules: [
        {
            test: /\.vue$/,
            loader: 'vue-loader'
        },
    ],
},
plugins: [
    new VueLoaderPlugin(),
],

當專案內import vue 可以使用別名(alias): 

resolve: {
    alias: {
        vue: 'vue/dist/vue.esm-bundler.js',
    },
},

因此完整的 webpack.config.js 如下:

const path = require('path');
const { VueLoaderPlugin } = require('vue-loader');

module.exports = {
    entry: './src/index.js',
    output: {
        filename: 'main.js',
        path: path.resolve(__dirname, 'dist'),
    },
    module: {
        rules: [
            {
                test: /\.vue$/,
                loader: 'vue-loader'
            },
        ],
    },
    resolve: {
        alias: {
            vue: 'vue/dist/vue.esm-bundler.js',
        },
    },
    plugins: [
        new VueLoaderPlugin(),
    ],
};


三、新增Entry, Ouput等內容

在目錄內 src/ 新增兩個檔案:

Vue3 主要元件 App.vue

<template>
  <div class="app">
    <p
      v-text="msg" />
  </div>
</template>

<script>
export default {
    name: 'App',
    setup() {
      return {
        msg: 'Hello World!',
      };
    },
};
</script>

新增 Entry File: index.js
設定別名的用途可以看第一行 import App from './App.vue';

import { createApp } from 'vue';
import App from './App.vue';

createApp(App)
    .mount('#app');


目錄 dist/ 則是新增 index.html,要注意的是先前 index.js 是綁定到 #app,所以 <div id="app"></div> 就是 vue render的地方。

<!DOCTYPE html>
<html>
    <head>
        <meta charset="utf-8" />
        <title>Getting Started</title>
    </head>
    <body>
        <div id="app"></div>
        <script src="./main.js"></script>
    </body>
</html>

此時的專案架構應該會像是:

├── package.json
├── dist
│   └── index.html
└── src
    ├── App.vue
    └── index.js

專案已經上傳 Github [vue3-webpack5-template],可以下載使用。


四、執行

執行下面的指令開始打包

npm run build


完成後目錄 dist/ 下多了一個檔案 main.js,此時可以開啟 index.html ,看到 Hello World! 就代表打包成功囉!


2021年8月8日 星期日

webpack5 安裝及基礎教學

根據維基百科:「Webpack 是一個開源的前端打包工具。Webpack 提供了前端開發缺乏的模組化開發方式,將各種靜態資源視為模組,並從它生成優化過的程式碼。」,使用前必須安裝 Node.js。

webpack 從版本4.0.0開始,可以不需要設定設定檔(webpack.config.js),設定檔最基本的設定分別是:EntryOutput,前者代表 webpack 必須從哪邊開始進行打包,後者則是定義封裝輸出的路徑以及檔案名稱。


以下參考官網簡單的範例,執行前請先安裝 Node.js,可以參考「安裝node js」替換成需要的版本。

一、安裝

請先新增一個專案目錄,並安裝 webpackwebpack-cli

mkdir webpack-demo
cd webpack-demo>
cd webpack-demo>
npm init -y>
npm install webpack webpack-cli --save-dev

此時目錄內應該會多一個 package.jsonnode_module/


二、新增Entry module

新增目錄 src/,以及檔案 index.js

const element = document.createElement('div');

element.innerHTML = 'Hello World!';

document.body.appendChild(component());

三、新增Output

新增目錄 dist/,以及檔案 index.html

<!DOCTYPE html>
<html>
  <head>
    <meta charset="utf-8" />
    <title>Getting Started</title>
  </head>
  <body>
    <script src="main.js"></script>
  </body>
</html>

此時的專案架構應該會像是:

webpack-demo
 |- package.json
 |- /dist
   |- index.html
 |- /src
   |- index.js

四、執行

執行下面的指令開始打包

npx webpack


完成後會發現目錄 dist/ 下多了一個檔案 main.js,此時可以開啟 index.html ,看到 Hello World! 就代表打包成功囉!


在沒有設定檔的情況下,webpack預設會尋找檔名 src 或是目錄 src/ 底下的 index,並將打包好的檔案放到目錄 dist/ 底下,預設檔名是 main.js,等同於:

const path = require('path');

module.exports = {
  entry: './src/index.js',
  output: {
    filename: 'main.js',
    path: path.resolve(__dirname, 'dist'),
  },
;

可以透過指令來指定設定檔的路徑及名稱:

npx webpack --config webpack.config.js

範例還未使用LoaderPlugin等功能,在這個範例還未使用 css/image,也可以透過 Loader設定處理,webpack可以處理Javascript、Json,安裝loader可以讓webpack處理更多類型的檔案。另外在這個範例裡手動新增 index.html ,其實也可以透過相關的 Plugin 自動產生。

其他進階設定的功能可以參考 https://webpack.js.org/guides/getting-started/ 了解更多。


2021年8月6日 星期五

線上程式碼編輯器 StackBlitz


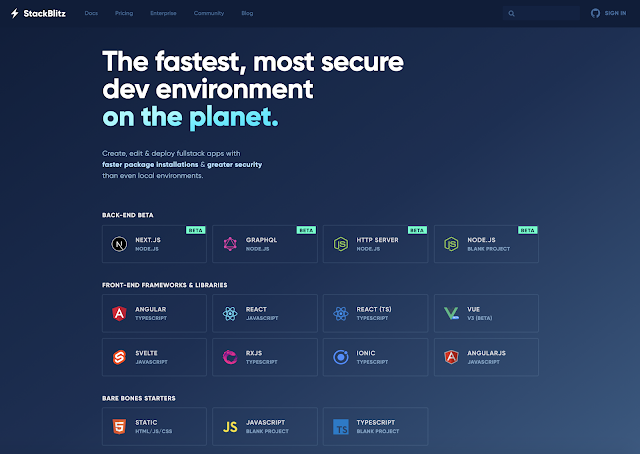
StackBlitz是線上的IDE,可以直接透過瀏覽器編輯專案,還能夠直接預覽。官網上提供快速建立 Angular、React等專案的連結,免費版只能建立公開的專案。

可以點選快速建立專案

另外也提供匯入或下載專案,登入github帳號還可以直接建立新的 Repo 並 sync 到 github 上,也支援編輯 github 上的專案,可以做修正並commit。

介面和 Visual Studio Code(VS Code)非常雷同,最重要的是強大的Dependencies管理,操作上也可以使用多個視窗的編輯,即使是多數現下編輯器都有的功能,這點也讓 StackBlitz 和CodePen、JSFiddle這些線上編輯器有很大的區隔。


如果是前端網頁開發,同時做預覽應該是蠻方便的,分享程式碼就更方便了。


2021年8月5日 星期四

安裝 Caddy 發生 ca-certificates 錯誤解決方式


按照「Ubuntu 安裝 web server Caddy 2」遇到的安裝問題:

echo "deb [trusted=yes] https://apt.fury.io/caddy/ /" \ | sudo tee -a /etc/apt/sources.list.d/caddy-fury.list
sudo apt update

執行第二行 update 後會跳出錯誤訊息:

"Certificate verification failed: The certificate is NOT trusted. The certificate issuer is unknown. Could not handshake: Error in the certificate verification. [IP: XX.XXX.XX.XXX XXX] Reading package lists... Done W: https://apt.fury.io/caddy/InRelease: No system certificates available. Try installing ca-certificates.


代表需要先安裝 ca-certificates

sudo apt install ca-certificates

安裝後重新再一次指令 sudo apt update ,就不會出現錯誤了。


參考資料:
https://caddy.community/t/solved-failed-to-install-caddy-with-official-auto-installation-command/9877

2021年2月21日 星期日

【升版指南】Vue 3 宣告事件 emits


Vue 3 新增 emits ,可以宣告需要傳遞到上層的事件名稱,而在 Vue2 時不需要宣告:
<template>
  <div>
    <p v-text="message" />
    <button v-on:click="$emit('accepted')">OK</button>
  </div>
</template>

<script>
  export default {
    props: ['message']
  }
</script>

在 Vue3 要在 emits 加上 accepted,寫法與 props 宣告的方式相似 :
<template>
  <div>
    <p v-text="message" />
    <button v-on:click="$emit('accepted')">
        OK
    </button>
  </div>
</template>

<script>
  export default {
    props: ['message'],
    emits: ['accepted'],
  }
</script>
雖然這個變動不大,但如果元件內忘記宣告,上層會收到兩次的事件觸發,造成非預期性的事件產生。

如同 props ,事件傳遞的資料可以加上驗證 (validator)。假設有個輸入訊息的 message 會透過 Button 點擊送出,期望送出的文字至少要10個字:
<template>
  <div>
    <input v-model="message">
    <button v-on:click="$emit('confirm', message)">
        OK
    </button>
  </div>
</template>

<script>
  export default {
    emits: {
    	confirm: message => message.length > 10,
    },
    data() {
        return {
            message: undefined,
        };
    },
  }
</script>


參考資料:https://v3.vuejs.org/guide/migration/emits-option.html

【升版指南】Vue 3 移除 $listeners 後如何跨元件傳遞事件

從 Vue2 到 Vue3 會有不兼容的特性,需要特別注意,其中跨元件傳遞資料和事件常用的 $attrs$listeners ,就是其中的一項。

在 Vue3 移除 $listeners ,全部改到 $attrs 裡,因此在 Vue2 裡可能會有這種情況:
<template>
  <label>
    <input
        type="text"
        v-bind="$attrs"
        v-on="$listeners">
  </label>
</template>

<script>
  export default {
    inheritAttrs: false
  }
</script>

在 Vue3 ,因為 $listeners 不存在,所有的綁定只要使用 $attrs
<template>
  <label>
    <input
        type="text"
        v-bind="$attrs">
  </label>
</template>

<script>
export default {
  inheritAttrs: false
}
</script>


假設只需要傳遞特定的事件,而非所有的事件,舉例要傳遞的事件是 update-name ,Vue 2 的寫法利用 $listeners 會是:
<template>
   <my-element
       :name="$attrs.name"
       @update-name="$listeners['update-name']" />
</template>

在 Vue3 裡需要加上 on 作為前綴,上層元件就能夠收到事件 update-name
<template>
   <my-element
       :name="$attrs.name"
       @update-name="$attrs['onUpdateName']" />
</template>

參考資料:https://v3.vuejs.org/guide/migration/listeners-removed.html