2020年3月31日 星期二

[Git] 手動安裝 git 2.6 + 新指令 sparse-checkout


sparse checkout 的功能可以讓使用者追蹤儲存庫裡特定的資料夾或檔案,不需要clone整個專案。新版本 git 2.6 有新指令 sparse-checkout 讓操作更簡單方便,關於 sparse-checkout 的設定方法可以參考「[Git] 如何使用 sparse checkout 下載 repository 內特定資料夾或檔案」進行操作,以下主要介紹如何手動安裝 git以及常用的 sparse-checkout 指令。

安裝

1. 安裝相關套件
安裝編譯 Git 所需的函式庫:curl, zlib, openssl, expat 和 libiconv
sudo apt-get install libcurl4-gnutls-dev libexpat1-dev gettext \
  libz-dev libssl-dev

2. 下載 git 原始碼
先下載 git 原始碼,接著解壓縮並進入目錄。
wget https://mirrors.edge.kernel.org/pub/software/scm/git/git-2.26.0.tar.gz
tar zxvf git-2.26.0.tar.gz
git-2.26.0
※如果需要其他 git 版本 [https://mirrors.edge.kernel.org/pub/software/scm/git/]

3. 編譯與安裝
編譯的時間稍微比較久
./configure --prefix=/usr \
            --with-gitconfig=/etc/gitconfig \
            --with-python=python3 && make
安裝
sudo make install

安裝後並沒有明顯的成功訊息,所以很難確定到底有沒有裝好,所以可以透過指令查看版本:
git --version
git version 2.26.0


指令說明

◆ sparse checkout 設定初始化
git sparse-checkout init
開啟設定之後,在目錄會自動新增檔案 sparse-checkout ,預設內容是:
/*
!/*/
代表根目錄內第一層內所有的檔案都列入追蹤;換句話說,根目錄裡任何資料夾內的檔案(包含資料夾)都會被忽略。

必須先確定檔案 .git/info/sparse-checkout 已經存在,使用下列的指令才不會報錯:
◆ 列出目前追蹤的檔案
git sparse-checkout list
◆ 新增指令資料夾或檔案
語法與 .gitignore 相似,最簡單是直接列出完整的檔案路徑,根據需求可以列出複雜的規則,像是追蹤特定的檔案附檔名,或是排除特定的項目。
git sparse-checkout add [folderPath/filePath]
◆ 更新及應用
將資料夾或檔案路徑規則寫入 sparse-checkout ,並馬上採用。
git sparse-checkout set [folderPath/filePath]
◆ 取消
git sparse-checkout disable

參考資料:
https://git-scm.com/download/linux
https://git-scm.com/book/zh-tw/v2/開始-Git-安裝教學
http://www.linuxfromscratch.org/blfs/view/svn/general/git.html

[Git] 如何使用 sparse checkout 下載 repository 內特定資料夾或檔案


一般下載專案的指令會將整個 repository 下載
git clone [URL]
有時候你只需要專案部分資料,git clone 無法只下載其中一個資料夾或檔案,但是 sparse checkout 可以達到!當專案非常龐大時,既能節省硬碟容量,也能提升工作效率。

1. 在現有資料夾中初始化倉儲
先決定要把資料放在哪個目錄,並執行初始化。
mkdir myproject
cd myproject
git init

2. 新增遠端版本庫
git remote add origin [URL]

3. 開啟 sparse checkout 設定
git config core.sparseCheckout true

4. 設定指定資料夾或檔案
根據你的需求,把資料夾或檔案的路徑寫進去。
方法一
echo "path/to/your/folder/" >> .git/info/sparse-checkout
echo "myFile.example" >> .git/info/sparse-checkout
方法二
vim .git/info/sparse-checkout
# .git/info/sparse-checkout
# Please list your directory and file path here
path/to/your/folder/
myFile.example

5. 取得儲存庫分支 master 的更新
最後一個步驟,git pull下載資料。
git pull origin origin master

2020年2月28日 星期五

[Git] 客製化Git Hooks管理專案


所謂的Git Hooks指的是以腳本等方式設定執行動作,當git指令執行時,會自動觸發這些腳本的機制,時機可能是在git指令之前或是之後。根據git指令又可以分為server side和client slide兩大類:commit和merge觸發的是client side,server side則是在網路上收到推上去的commit(pushed commit)。

hooks 存放在目錄 /.git/hooks/ 裡,執行 git init 初始化時,git自動在目錄裡產生一些shell script範本,你也可以用Ruby或python等實作。範例可以直接使用,但要記得把副檔名的 .sample 拿掉。


如果需要自己新建hook,請確認一下檔案的執行權限已經開啟。
chmod +x [filePath]

常見的Hooks
Client Side
以下為4個與commit相關的hook:
  • 在commit之前會執行 pre-commit,可以運用在執行功能驗證、單元測試或是coding style的檢查,若有任何錯誤發生時,這個commit會被捨棄不執行。也可以下指令 git commit --no-verify 略過hook的執行。
  • prepare-commit-msg,這個hook對於一般commit比較不實用,多在commit訊息模板、merge commit、squash commits、amended commits等自動產生commit訊息的類型。
  • commit-msg需要commit訊息的模板檔案路徑作為參數,如果錯誤發生,git會停止進行這個commit,來確保所有的commit訊息都符合需要的格式。
  • commit結束後,會執行 post-commit ,不需要任何參數,你可以用 git log -1 HEAD 來確認剛剛commit的內容,或者通知其他類似的訊息。


Server Side
  • server端收到push時,首先執行 pre-receive ,如果錯誤發生,所有的commit將不會被受理。可以用來檢查有沒有任何non-fast-forwards。
  • updatepre-receive 有點相似。
  • post-receive 會在整個push過程結束後執行,可以用來通知專案成員或是其他服務的更新等。這個hook不會影響push過程,但在hook執行完之前,用戶端和伺服器端會持續連線,因此要避免在腳本中執行時間較長的工作。

參考資料:
https://git-scm.com/book/zh-tw/v2/Customizing-Git-Git-Hooks

2020年2月27日 星期四

[JavaScript] 安裝Jest單元測試


Jest為javascript的前端測試工具,安裝快速且不需複雜的設定,執行速度快,所有測項可以同時進行讓效能最大化,並可以搭配用在vue.js、React等進行UI component的測試。

安裝指令

npm install --save-dev jest
npm的安裝教學可以參考「教學」。


實作

以簡單的JavaScript程式來測試執行,將傳入的陣列合併成字串回傳:
// combineArray.js
const combineArray = (array, separator = ',') => {
        if (!Array.isArray(array)) {
                return new Error('Invalid input array');
        }
        if (typeof separator !== 'string') {
                return new Error('Invalid input separator');
        }

        return array.join(separator)
};

module.exports = combineArray;
測試的副檔名 *.test.js
// combineArray.test.js
const combineArray = require('./combineArray');

test('Combine array: [1, 2]', () => {
        expect(combineArray([1,2])).toBe('1,2');
});
  • 每個一測試檔案都必須至少有一個test(),第一個參數是名稱;第二個參數是執行expect實際測試內容的function。[參考]
  • expect()常用的方式expect(A).toBe(B),也就是期望A會等於B。[參考]

package.json新增內容:
{
  "scripts": {
    "test": "jest"
  }
}

執行測試

npm run test
所有的*.test.js都會跑過一次,並顯示結果,包含有多少測試項目以及成功和失敗的數量。


根據程式碼的複雜程度可以寫出許多測試項目,為了方便辨識測試內容,describe()可以將測項分類、建立群組,.toThrow()判斷錯誤發生的情形等等:
const combineArray = require('./combineArray');

describe('Combine array', () => {
        const inputArray = [1, 2];

        test('Default', () => {
                expect(combineArray([])).toBe('');
                expect(combineArray(inputArray)).toBe('1,2');
                expect(combineArray(inputArray, undefined)).toBe('1,2');
        });
        test('With custom separator', () => {
                expect(combineArray(inputArray, ' ')).toBe('1 2');
                expect(combineArray(inputArray, '*')).toBe('1*2');
                expect(combineArray(inputArray, '-')).toBe('1-2');
        });

        describe('With invalid input', () => {
                test.each(
                        [undefined, null, 1, 'string', {}]
                )('Input array: %s', (item) => {
                        expect(() => {
                                combineArray(item);
                        }).toThrow(new Error('Invalid input array'));
                });
                test.each(
                        [null, 1, [], {}]
                )('Input separator: %s', (item) => {
                        expect(() => {
                                combineArray(inputArray, item);
                        }).toThrow(new Error('Invalid input separator'));
                });
        });
});
執行結果


若有任何不符合預期的結果,console上會寫出哪一個測項失敗,預期的輸出和輸入為何。測試項目寫得越完備越好,往後即使更新主程式,也可以再以指令執行測試,確保程式運作如你所預期。

更多的方法可以前往官網參考:
https://jestjs.io/

2020年2月25日 星期二

[Vue.js] computed的set()和get()使用方式


一般情況下,為了避免在 template 中寫入過度複雜的計算,可以選擇放到 computed
<template>
    <div v-text="colorList.join(',')" />
</template>

<script>
export default {
    data() {
        return {
            colorList: ['blue', 'green', 'red'],
        };
    },
};
</script>
// Recommend
<template>
    <div v-text="displayColorList" />
</template>

<script>
export default {
    data() {
        return {
            colorList: ['blue', 'green', 'red'],
        };
    },
    computed: {
        displayColorList() {
            return this.colorList.join(',');
        },
    },
};
</script>
預設的情況下computed只有 get() ,必須要有一個return值,會根據相依的值動態計算。computeddata很像,但如果要直接修改值,必須加上 set()

如果firstNamelastName被修改時,會觸發 set() ,第一個參數為這次觸發更新輸入的值。參考範例:
<template>
    <div>
        <input v-model="firstName">
        <input v-model="lastName">
        <input v-text="fullName" />
    </div>
</template>

<script>
export default {
    data() {
        return {
            fullName: '',
        };
    },
    computed: {
        firstName: {
            get() {
                return this.fullName.split(' ')[0] || '';
            },
            set(firstName) {
                this.fullName = `${firstName} ${this.lastName}`;
            },
        },
        lastName: {
            get() {
                return this.fullName.split(' ')[1] || '';
            },
            set(lastName) {
                this.fullName = `${this.firstName} ${lastName}`;
            },
        },
    },
};
</script>

2019年12月26日 星期四

[Vue.js] 跨元件的資料傳遞 Eventbus 簡易使用範例


Eventbus可以達成跨元件的資料傳遞,這個範例只是作為Eventbus效果的示範,依據實際的應用時,不一定使用eventbus是最合適的,可以考量使用props/emit父子元件的傳遞方式,或是vuex來需要共用的資源。

先參考一下整體的檔案結構:
├── App.vue
├── components
│   ├── Button.vue
│   └── DisplayBoard.vue
├── libs
│   └── eventbus.js
└── main.js

eventbus.js
import Vue from 'vue';
export const EventBus = new Vue();

MyButton.js
傳遞eventbus的元件,當按下按鈕時,會將目前的值傳出去,以$emit發出一個 "add-count" 的事件。
<template>
  <button @click="onClickCountAdd">Click</button>
</template>

<script>
// Import the EventBus we just created.
import { EventBus } from '../libs/eventbus.js';

export default {
  data() {
    return {
      clickCount: 0,
    }
  },
  methods: {
    onClickCountAdd() {
      this.clickCount++;
      // Send the event on a channel (add-count) with a payload (the click count.)
      EventBus.$emit('add-count', this.clickCount);
    }
  }
}
</script>

DisplayBoard.js
註冊eventbus的元件,$on是註冊;$off是取消,兩者必須成雙出現,可以避免產生重複綁定。display-board註冊 "add-count" 的事件,後面的參數是時間接收到事件時,負責處理的method。
<template>
  <div v-text="displayCount" />
</template>

<script>
// Import the EventBus we just created.
import { EventBus } from '../libs/eventbus.js';

export default {
  data() {
    return {
      displayCount: 0,
    }
  },
  created() {
    this.handleClick = this.handleClick.bind(this);
    // Listen to the event.
    EventBus.$on('add-count', this.handleClick);
  },
  destroyed() {
    // Stop listening.
    EventBus.$off('add-count', this.handleClick);
  },
  methods: {
    handleClick(clickCount) {
      this.displayCount = clickCount;
    }
  }
}
</script>

App.js
<template>
  <div>
    <my-button />
    <display-board />
  </div>
</template>

<script>
import MyButton from './components/MyButton'
import DisplayBoard from './components/DisplayBoard'

export default {
  components: {
    MyButton,
    DisplayBoard,
  }
}
</script>

最終成果,隨著my-button內按鍵點擊,display-board需呈現目前的點擊數。


2019年12月25日 星期三

Symfony4.3 基本應用【第四篇】權限與安全 Authentication & Security


你更傾向影片教學?查看教學影片

Symfony的安全系統非常強大,但是設定方法常常讓人困擾,別擔心!在這篇文章,將一步一步的教你如何設定應用程式的安全系統:
  1. 安裝套件
  2. 建立User Class
  3. 認證與防火牆
  4. 拒絕存取(權限)
  5. 獲取目前的User物件

還有幾個重要的主題也會在後面討論。


1) 安裝

在應用程式裡使用安全系統的功能前,先透過
Symfony Flex執行下面的指令安裝:
composer require symfony/security-bundle


2a) 建立你的User Class

無論你將如何認證(authenticate)(e.g. 登入表單或是API tokens)或者你的使用者資料存放在哪裡(資料庫、單一登入入口),你都必須先建立一個"User" class,最簡單的方式是使用MakerBundle

我們先假設你會把使用者資料用Doctrine存在資料庫裡:
php bin/console make:user

The name of the security user class (e.g. User) [User]:
> User

Do you want to store user data in the database (via Doctrine)? (yes/no) [yes]:
> yes

Enter a property name that will be the unique "display" name for the user (e.g.
email, username, uuid [email]
> email

Does this app need to hash/check user passwords? (yes/no) [yes]:
> yes

created: src/Entity/User.php
created: src/Repository/UserRepository.php
updated: src/Entity/User.php
updated: config/packages/security.yaml
就是這樣!指令會詢問幾個問題來了解你的需求並產生User class,最重要的是檔案 User.phpUser class唯一的規定就是必須實作(implemnt) UserInterface,如果有需要你也可以任意加上任何其他欄位或是程式邏輯,若你的 User class是一個實例(entity)(像是上述的例子),你可以使用make:entity command來加上更多欄位,並且要記得對新的實例執行移植(migration)。
php bin/console make:migration
php bin/console doctrine:migrations:migrate


2b) The "User Provider"

除了 User class之外,你還需要一個"User provider":一個class,能夠幫助你從session重新載入使用者資訊,以及一些選擇性的功能像是remember meimpersonation

幸運地是,指令 make:user 已經幫你在 security.yaml 以關鍵字(key) providers 設定好了。

如果你的 User class是一個實體,你不需要額外做任何事,但如果你的class不是實體,指令 make:user 會需要產生一個需要由你完成的class UserProvider ,了解更多關於user providers的資訊:User Providers


2c) 密碼編碼(Encoding Passwords)

並不是所有應用程式的"user"都需要密碼,如果用戶需要設定密碼,你可以在 security.yaml 決定如何將密碼進行編碼,make:user 指令會重新幫你設定:
# config/packages/security.yaml
security:
    # ...

    encoders:
        # use your user class name here
        App\Entity\User:
            # Use native password encoder
            # This value auto-selects the best possible hashing algorithm.
            algorithm: auto
<!-- config/packages/security.xml -->
<?xml version="1.0" encoding="UTF-8"?>
<srv:container xmlns="http://symfony.com/schema/dic/security"
    xmlns:xsi="http://www.w3.org/2001/XMLSchema-instance"
    xmlns:srv="http://symfony.com/schema/dic/services"
    xsi:schemaLocation="http://symfony.com/schema/dic/services
        https://symfony.com/schema/dic/services/services-1.0.xsd">

    <config>
        <!-- ... -->

        <encoder class="App\Entity\User"
            algorithm="bcrypt"
            cost="12"/>

        <!-- ... -->
    </config>
</srv:container>
// config/packages/security.php
$container->loadFromExtension('security', [
    // ...

    'encoders' => [
        'App\Entity\User' => [
            'algorithm' => 'bcrypt',
            'cost' => 12,
        ]
    ],

    // ...
]);
現在Symfony知道你想要如何對密碼編碼,你可以在儲存使用者到資料庫之前,使用 UserPasswordEncoderInterface 這個服務。

例如,透過DoctrineFixturesBundle,你可以在資料庫建立一些用戶虛擬資料:
php bin/console make:fixtures

The class name of the fixtures to create (e.g. AppFixtures):
> UserFixtures
使用這個服務對密碼編碼:
// src/DataFixtures/UserFixtures.php

+ use Symfony\Component\Security\Core\Encoder\UserPasswordEncoderInterface;
// ...

class UserFixtures extends Fixture
{
    private $passwordEncoder;

    public function __construct(UserPasswordEncoderInterface $passwordEncoder)
    {
        $this->passwordEncoder = $passwordEncoder;
    }

    public function load(ObjectManager $manager)
    {
        $user = new User();
        // ...

        $user->setPassword($this->passwordEncoder->encodePassword(
            $user,
            'the_new_password'
        ));

        // ...
    }
}
你也可以執行下面指令手動編碼密碼:
php bin/console security:encode-password


3a) 認證與防火牆(Authentication & Firewalls)

安全系統的設定都在 config/packages/security.yaml,最重要的部分是 firewalls
# config/packages/security.yaml
security:
    firewalls:
        dev:
            pattern: ^/(_(profiler|wdt)|css|images|js)/
            security: false
        main:
            anonymous: ~
<!-- config/packages/security.xml -->
<?xml version="1.0" encoding="UTF-8"?>
<srv:container xmlns="http://symfony.com/schema/dic/security"
    xmlns:xsi="http://www.w3.org/2001/XMLSchema-instance"
    xmlns:srv="http://symfony.com/schema/dic/services"
    xsi:schemaLocation="http://symfony.com/schema/dic/services
        https://symfony.com/schema/dic/services/services-1.0.xsd">

    <config>
        <firewall name="dev"
            pattern="^/(_(profiler|wdt)|css|images|js)/"
            security="false"/>

        <firewall name="main">
            <anonymous/>
        </firewall>
    </config>
</srv:container>
// config/packages/security.php
$container->loadFromExtension('security', [
    'firewalls' => [
        'dev' => [
            'pattern'   => '^/(_(profiler|wdt)|css|images|js)/',
            'security'  => false,
        ),
        'main' => [
            'anonymous' => null,
        ],
    ],
]);
認證系統的"firewall":底下的設定定義用戶如何進行認證(e.g. 登入表單、API token等等)。

有一個防火牆對每一個請求都啟用效果:Symfony使用關鍵字(key)
pattern 尋找第一個符合(你也可以match by host or other things)。dev 防火牆是虛設的:它只會確保你不會不小心阻擋Symfony開發工具 - 前綴為 /_profiler/_wdt的URLs 。

所有真正的URLs會由main防火牆處理(如果沒有 pattern key代表適用所有的URLs),但是這並不表示所有的URL都需要認證。多虧了 anonymous key,這個防火牆可以被匿名訪問。

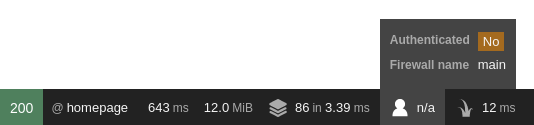
事實上,如果你馬上回到首頁,你"將會"發現你被"認證(authenticated)"為 anon. ,別被下面Authenticated的"Yes"騙了,防火牆驗證不出你的身分,所以你是匿名訪客。


你將會學到如何拒絕某些URLs或控制器的存取。

如果你看不到底下工具列,請安裝profiler
composer require --dev symfony/profiler-pack

現在我們已經了解防火牆,下一步是建立一個用戶認證的方法!


3b) 對用戶認證

Symfony認證有一點神奇,因為你不需要建立路由或是控制器來處理登入,你只要啟動認證提供者(authentication provider):某些程式在控制器之前會自動被呼叫。

Symfony有幾個內建的認證提供者(built-in authentication providers),如果使用情境與其中一個正好相符,那就太棒了!但是在大部分的情況,包含一個登入表單,我們建議建立一個Guard Authenticator: 一個可以讓你控制每一個部分認證步驟的class(請看下個章節)。

如果應用程式透過第三方服務像是Google、Facebook或是Twitter(社群登入)讓使用者登入,請查看HWIOAuthBundle


Guard Authenticators
Guard authenticator是提供認證步驟完整的控制權的class,有很多不同方式建立認證,所以這邊有一些常見的情境:
  • 如何建立登入表單
  • 客製化認證系統(API Token)

如果要瞭解更詳細的認證和其運作方式,請看Custom Authentication System with Guard (API Token Example)


4) 拒絕存取、角色以及其他認證

使用者現在可以透過登入表單登入你的應用程式,太棒了!現在你需要學習如何拒絕訪問,以及操作User物件,這被稱為authorization,它的工作是決定用戶是否可以使用某些資源(URL、model、呼叫method等等...)。

認證分為兩個部分:
  1. 使用者在登入後獲得特定的角色列表(e.g. ROLE_ADMIN )。
  2. 你加入特定的代碼,使得資源(e.g. URL、controller)需要特定的"屬性(attribute)"(大多像是一個 ROLE_ADMIN 的角色)才能夠存取。

角色(Roles)
當用戶登入,Symfony呼叫 User 內的方法 getRoles() 來決定此用戶的角色,在先前產生的 User ,角色為一個存放在資料庫的陣列,且所有的使用者至少會有一個角色:ROLE_USER
// src/Entity/User.php
// ...

/**
 * @ORM\Column(type="json")
 */
private $roles = [];

public function getRoles(): array
{
    $roles = $this->roles;
    // guarantee every user at least has ROLE_USER
    $roles[] = 'ROLE_USER';

    return array_unique($roles);
}
這是一個很常見的狀況,但你可以根據使用者需要什麼角色來決定怎麼做,這邊有一些準則可以參考:
  • 每一個角色必須ROLE_ 作為開頭(否則,無法如預期運作)
  • 除了上述規則,角色只是一段字串,你可以發明所需的內容(e.g. ROLE_PRODUCT_ADMIN)

你將使用這些角色來授予特定區域的存取權限,你還可以使用角色層次性結構(role hierarchy),使得擁有某些角色會自動獲得其他角色。

拒絕訪問的代碼設定(Add Code to Deny Access)
有兩種方法來拒絕訪問:
  1. access_control in security.yaml讓你可以確保URL格式(e.g. /admin/*),簡單但是彈性較少。
  2. in your controller (or other code)

安全的URL格式 (access_control)
保護應用程式最簡單的方法之一就是在 security.yaml 設定完整的URL格式,例如,所有 ROLE_ADMIN 的URL路徑都以 /admin 開頭:
# config/packages/security.yaml
security:
    # ...

    firewalls:
        # ...
        main:
            # ...

    access_control:
        # require ROLE_ADMIN for /admin*
        - { path: '^/admin', roles: ROLE_ADMIN }

        # the 'path' value can be any valid regular expression
        # (this one will match URLs like /api/post/7298 and /api/comment/528491)
        - { path: ^/api/(post|comment)/\d+$, roles: ROLE_USER }
<!-- config/packages/security.xml -->
<?xml version="1.0" encoding="UTF-8"?>
<srv:container xmlns="http://symfony.com/schema/dic/security"
    xmlns:xsi="http://www.w3.org/2001/XMLSchema-instance"
    xmlns:srv="http://symfony.com/schema/dic/services"
    xsi:schemaLocation="http://symfony.com/schema/dic/services
        https://symfony.com/schema/dic/services/services-1.0.xsd">

    <config>
        <!-- ... -->

        <firewall name="main">
            <!-- ... -->
        </firewall>

        <!-- require ROLE_ADMIN for /admin* -->
        <rule path="^/admin" role="ROLE_ADMIN"/>

        <!-- the 'path' value can be any valid regular expression
             (this one will match URLs like /api/post/7298 and /api/comment/528491) -->
        <rule path="^/api/(post|comment)/\d+$" role="ROLE_USER"/>
    </config>
</srv:container>
// config/packages/security.php
$container->loadFromExtension('security', [
    // ...

    'firewalls' => [
        // ...
        'main' => [
            // ...
        ],
    ],
    'access_control' => [
        // require ROLE_ADMIN for /admin*
        ['path' => '^/admin', 'roles' => 'ROLE_ADMIN'],

        // the 'path' value can be any valid regular expression
        // (this one will match URLs like /api/post/7298 and /api/comment/528491)
        ['path' => '^/api/(post|comment)/\d+$', 'roles' => 'ROLE_USER'],
    ],
]);
只要你需要,可以設定多個URL格式,每一個URL格式都是正規表達式(regular expression),但是每一個請求只會和其中一個配對:Symfony會從設定表的開頭依序比對,直到找到第一個符合的就停止:
# config/packages/security.yaml
security:
    # ...

    access_control:
        # matches /admin/users/*
        - { path: '^/admin/users', roles: ROLE_SUPER_ADMIN }

        # matches /admin/* except for anything matching the above rule
        - { path: '^/admin', roles: ROLE_ADMIN }
<!-- config/packages/security.xml -->
<?xml version="1.0" encoding="UTF-8"?>
<srv:container xmlns="http://symfony.com/schema/dic/security"
    xmlns:xsi="http://www.w3.org/2001/XMLSchema-instance"
    xmlns:srv="http://symfony.com/schema/dic/services"
    xsi:schemaLocation="http://symfony.com/schema/dic/services
        https://symfony.com/schema/dic/services/services-1.0.xsd">

    <config>
        <!-- ... -->

        <rule path="^/admin/users" role="ROLE_SUPER_ADMIN"/>
        <rule path="^/admin" role="ROLE_ADMIN"/>
    </config>
</srv:container>
// config/packages/security.php
$container->loadFromExtension('security', [
    // ...

    'access_control' => [
        ['path' => '^/admin/users', 'roles' => 'ROLE_SUPER_ADMIN'],
        ['path' => '^/admin', 'roles' => 'ROLE_ADMIN'],
    ],
]);
在路徑之前加上
^ 表示只有URLs以此模式開頭才算是符合,例如:有個路徑
/admin (沒有加上 ^ )將會與 /admin/foo,甚至是 /foo/admin

每一個 access_control 也可以配對IP位址、主機名稱和HTTP methods,也可以用來將用戶重新導向到 https 版本的URL,更多請看How Does the Security access_control Work?

安全的控制器和其他程式碼 (Securing Controllers and other Code)
你可以在控制器裡拒絕存取:
// src/Controller/AdminController.php
// ...

public function adminDashboard()
{
    $this->denyAccessUnlessGranted('ROLE_ADMIN');

    // or add an optional message - seen by developers
    $this->denyAccessUnlessGranted('ROLE_ADMIN', null, 'User tried to access a page without having ROLE_ADMIN');
}
就是這樣,如果不允許被存取,會拋出一個特殊的例外 AccessDeniedException ,且不會執行控制器內其他程式,接著有兩件事會發生:
  1. 如果使用者尚未登入,他們將會被要求登入。(例如導回登入頁面)
  2. 如果使用者已經登入,但是沒有 ROLE_ADMIN ,他們將會看到顯示403拒絕存取的頁面(此頁面也可以客製)
幸虧SensioFrameworkExtraBundle,你也可以使用annotations加強控制器的安全:
// src/Controller/AdminController.php
// ...

use Sensio\Bundle\FrameworkExtraBundle\Configuration\IsGranted;

/**
 * Require ROLE_ADMIN for *every* controller method in this class.
 *
 * @IsGranted("ROLE_ADMIN")
 */
class AdminController extends AbstractController
{
    /**
     * Require ROLE_ADMIN for only this controller method.
     *
     * @IsGranted("ROLE_ADMIN")
     */
    public function adminDashboard()
    {
        // ...
    }
}
若要知道更多資訊,請看FrameworkExtraBundle documentation

模板的存取控制
如果你想要確認現在的用戶是否有某個角色權限,你可以用一個既有的函式 is_granted(),可用於任何的Twig模板:
{% if is_granted('ROLE_ADMIN') %}
    <a href="...">Delete</a>
{% endif %}

Securing other Services
詳見How to Secure any Service or Method in your Application


資料翻譯自:
https://symfony.com/doc/4.3/security.html

系列文章:

2019年9月23日 星期一

[Vue.js] storybook安裝方式與環境建置

storybook是UI的開發環境,可以讓開發人員獨立建立元件,並在隔離的開發環境中互動式地展示元件。

storybook在主程式以外運作,因此不需要擔心應用程式特定的依賴關係或需求,用戶可以獨立開發UI元件。

環境
  • Ubuntu
  • node.js v10.15.1

套件版本:
  • Vue 2.6.10
  • Storybook 5.2.1

第一步、安裝storybook及相關套件

安裝 @storybook/vue 套件
npm install @storybook/vue --save-dev
安裝其他相依套件,包含:vuevue-loadervue-template-compiler@babel/corebabel-loaderbabel-preset-vue
npm install vue --save
npm install vue-loader vue-template-compiler @babel/core babel-loader babel-preset-vue --save-dev


第二步、新增npm script

在檔案package.json新增script:
{
  "scripts": {
    "storybook": "start-storybook"
  }
  ...
}


第三步、新增config

在檔案.storybook/config.js新增config:
import { configure } from '@storybook/vue';

configure(require.context('../src/components/stories', true, /\.stories\.js$/), module);
代表會載入所有在資料夾 ../src/components/stories 內的符合 *.stories.js 的檔案。

第四步、新增stories

新增一個stories Button.stories.js
// src/components/stories/Button.stories.js
import Vue from 'vue';
import MyButton from '../Button.vue';

export default { title: 'Button' };

export const withText = () => '<my-button>with text</my-button>';

export const withEmoji = () => '<my-button>😀 😎 👍 💯</my-button>';

export const asAComponent = () => ({
  components: { MyButton },
  template: '<my-button :rounded="true">rounded</my-button>'
});


第五步、執行

npm run storybook
打開瀏覽器確認


參考專案架構:
./
├── .storybook
│   └── config.js
├── babel.config.js
├── package.json
├── package-lock.json
├── public
│   ├── favicon.ico
│   └── index.html
├── README.md
└── src
    ├── App.vue
    ├── assets
    │   └── logo.png
    ├── components
    │   ├── Button.vue
    │   └── stories
    │       └── Button.stories.js
    └── main.js

資料來源:https://storybook.js.org/docs/guides/guide-vue/

2019年9月22日 星期日

Symfony4.3 基本應用【第三篇】主控台指令 Console Commands


Symfony透過bin/console提供許多指令(e.g. 常見的指令bin/console cache:clear),這些指令是由Console component建立,你可以使用它來建立新指令。


The Console: APP_ENV & APP_DEBUG

檔案.env裡的變數APP_ENV定義了主控台指令所運行的環境(environment),預設為 dev ,另外也會讀取 APP_DEBUG 的值來決定是否開啟或關閉"除錯(debug)"模式(預設 1 是開啟)。

若要在其他環境跑指令或是除錯模式,可以編輯 APP_ENVAPP_DEBUG 的值。


建立指令

指令定義在一個延展(extned)Command的class。例如,你可能想要有個指令可以建立使用者:
// src/Command/CreateUserCommand.php
namespace App\Command;

use Symfony\Component\Console\Command\Command;
use Symfony\Component\Console\Input\InputInterface;
use Symfony\Component\Console\Output\OutputInterface;

class CreateUserCommand extends Command
{
    // the name of the command (the part after "bin/console")
    protected static $defaultName = 'app:create-user';

    protected function configure()
    {
        // ...
    }

    protected function execute(InputInterface $input, OutputInterface $output)
    {
        // ...
    }
}


設定指令

你可以選擇要不要定義敘述(description)、提示語和輸入選項及變數(input options and arguments):
// ...
protected function configure()
{
    $this
        // the short description shown while running "php bin/console list"
        ->setDescription('Creates a new user.')

        // the full command description shown when running the command with
        // the "--help" option
        ->setHelp('This command allows you to create a user...')
    ;
}
在指令的建構裡,最後會自動呼叫configure(),如果你的指令定義在自己的建構函數裡,先設定屬性並呼叫上層的建構函數(constructor),讓它的屬性可以在configure()裡被使用。
// ...
use Symfony\Component\Console\Command\Command;
use Symfony\Component\Console\Input\InputArgument;

class CreateUserCommand extends Command
{
    // ...

    public function __construct(bool $requirePassword = false)
    {
        // best practices recommend to call the parent constructor first and
        // then set your own properties. That wouldn't work in this case
        // because configure() needs the properties set in this constructor
        $this->requirePassword = $requirePassword;

        parent::__construct();
    }

    protected function configure()
    {
        $this
            // ...
            ->addArgument('password', $this->requirePassword ? InputArgument::REQUIRED : InputArgument::OPTIONAL, 'User password')
        ;
    }
}


註冊指令

Symfony指令必須註冊成為一個服務(serviece)並標記(tagged)上標籤console.command,如果你使用預設的service.yaml設定檔(default service.yaml configuration),它已經幫你把這些事處理好了,真是多虧了autoconfiguration


執行指令

設定並註冊指令之後,你可以在終端機裡執行:
php bin/console app:create-user
就像你預期的一樣,這個指令並不會執行任何事情,因為你根本還沒寫任何程式邏輯在內,請把這些寫到 execute() 裡面。


主控台輸出(Console Output)

execute()方法可以存取輸出端,將訊息呈現在主控台上。
// ...
protected function execute(InputInterface $input, OutputInterface $output)
{
    // outputs multiple lines to the console (adding "\n" at the end of each line)
    $output->writeln([
        'User Creator',
        '============',
        '',
    ]);

    // the value returned by someMethod() can be an iterator (https://secure.php.net/iterator)
    // that generates and returns the messages with the 'yield' PHP keyword
    $output->writeln($this->someMethod());

    // outputs a message followed by a "\n"
    $output->writeln('Whoa!');

    // outputs a message without adding a "\n" at the end of the line
    $output->write('You are about to ');
    $output->write('create a user.');
}
現在請試著執行指令:
php bin/console app:create-user
User Creator
============

Whoa!
You are about to create a user.


輸出區塊(Output Sections)

一般主控台的輸入可以分為多個獨立的區塊(section),稱為"output sections",當你需要清除或是覆蓋掉輸出的資訊,可以建立一個或是多個區塊。

section()會回傳一個ConsoleSectionOutput實例(instance),用來建立區塊:
class MyCommand extends Command
{
    protected function execute(InputInterface $input, OutputInterface $output)
    {
        $section1 = $output->section();
        $section2 = $output->section();
        $section1->writeln('Hello');
        $section2->writeln('World!');
        // Output displays "Hello\nWorld!\n"

        // overwrite() replaces all the existing section contents with the given content
        $section1->overwrite('Goodbye');
        // Output now displays "Goodbye\nWorld!\n"

        // clear() deletes all the section contents...
        $section2->clear();
        // Output now displays "Goodbye\n"

        // ...but you can also delete a given number of lines
        // (this example deletes the last two lines of the section)
        $section1->clear(2);
        // Output is now completely empty!
    }
}
每個區塊的資訊會自動換行。

輸出區塊可以讓你以更進階的方式操控主控台輸出,像是呈現多個進度條(displaying multiple progress bars),能夠獨立地更新;以及加入多列(rows)到已經呈現的表格中。


主控台輸入(Console Input)

使用輸入選項或變數來傳遞訊息給指令:
use Symfony\Component\Console\Input\InputArgument;

// ...
protected function configure()
{
    $this
        // configure an argument
        ->addArgument('username', InputArgument::REQUIRED, 'The username of the user.')
        // ...
    ;
}

// ...
public function execute(InputInterface $input, OutputInterface $output)
{
    $output->writeln([
        'User Creator',
        '============',
        '',
    ]);

    // retrieve the argument value using getArgument()
    $output->writeln('Username: '.$input->getArgument('username'));
}
現在,你可以在指令裡傳入使用者名稱:
php bin/console app:create-user Wouter
User Creator
============

Username: Wouter
請看Console Input (Arguments & Options)了解更多關於輸入選項或變數的訊息。


從服務容器中取得服務(Getting Services from the Service Container)

為了要真正建立新的使用者,指令必須存取一些服務(services),因為指令已經註冊成服務,所以你可以使用一般的依賴注入(dependency injection),想像一下你打算存取一個服務 App\Service\UserManager
// ...
use App\Service\UserManager;
use Symfony\Component\Console\Command\Command;

class CreateUserCommand extends Command
{
    private $userManager;

    public function __construct(UserManager $userManager)
    {
        $this->userManager = $userManager;

        parent::__construct();
    }

    // ...

    protected function execute(InputInterface $input, OutputInterface $output)
    {
        // ...

        $this->userManager->create($input->getArgument('username'));

        $output->writeln('User successfully generated!');
    }
}


指令的生命週期

運行指令時有三個生命週期方法可以調用(invoked):
initialize()(optional)
這個方法會在interact()execute()之前執行,主要的目的是初始化在其他指令方法中使用的變數。

interact()(optional)
這個方法在initialize()之後、execute()之前執行,目的是確認某些選項或變數是否遺漏,以及互動式地詢問使用者那些值,這是最後一次確認遺漏的選項或變數,若經過這個步驟仍有缺少的選項或變數,會導致錯誤發生。

execute()(required)
這個方法在interact()initialize()之後執行,它包含所有指令程式邏輯。


測試指令

Symfony提供一些工具幫助你測試指令,最有用的是一個叫CommandTester的class,它使用特殊的輸入和輸出classes,無需實際控制台即可輕鬆進行測試:
// tests/Command/CreateUserCommandTest.php
namespace App\Tests\Command;

use Symfony\Bundle\FrameworkBundle\Console\Application;
use Symfony\Bundle\FrameworkBundle\Test\KernelTestCase;
use Symfony\Component\Console\Tester\CommandTester;

class CreateUserCommandTest extends KernelTestCase
{
    public function testExecute()
    {
        $kernel = static::createKernel();
        $application = new Application($kernel);

        $command = $application->find('app:create-user');
        $commandTester = new CommandTester($command);
        $commandTester->execute([
            'command'  => $command->getName(),

            // pass arguments to the helper
            'username' => 'Wouter',

            // prefix the key with two dashes when passing options,
            // e.g: '--some-option' => 'option_value',
        ]);

        // the output of the command in the console
        $output = $commandTester->getDisplay();
        $this->assertContains('Username: Wouter', $output);

        // ...
    }
}
你可以透過ApplicationTester測試整個主控台應用程式。

當你在獨立的專案使用Console元件,請用Symfony\Component\Console\Application並且延展\PHPUnit\Framework\TestCase


紀錄指令錯誤(Logging Command Errors)

運行指令時若拋出任何例外(exception),Symfony會包含整個失敗的指令新增一筆紀錄。此外,Symfony註冊事件訂閱者(event subscriber)來監聽ConsoleEvents::TERMINATE event,以及每當指令並沒有以狀態0成功離開時,記錄這些訊息。


資料翻譯自:
https://symfony.com/doc/4.3/console.html

系列文章:


2019年9月21日 星期六

Symfony4.3 基本應用【第二篇】Doctrine ORM


你更傾向影片教學?查看教學影片

Symfony並未提供元件來與資料庫互動,但它確實與第三方套件Doctrine有緊密的結合。

這篇文章主要關於使用Doctrine ORM,如果你比較喜歡使用資料庫的query指令,建議看"如何使用Doctrine DBAL"。

若你堅持使用Doctrine ODM套件將資料放在MongoDB,請參考文件"DoctrineMongoDBBundle"。


安裝 Doctrine

首先,透過ORMpack以及MakeBundle安裝Doctrine,以利於產生一些代碼:
composer require symfony/orm-pack
composer require --dev symfony/maker-bundle


設定資料庫

資料庫的連線資料會當作環境變數儲存,稱為 DATABASE_URL ,開發時,你可以找到檔案 .env 並自訂。
# .env (or override DATABASE_URL in .env.local to avoid committing your changes)

# customize this line!
DATABASE_URL="mysql://db_user:db_password@127.0.0.1:3306/db_name"

# to use sqlite:
# DATABASE_URL="sqlite:///%kernel.project_dir%/var/app.db"
如果username、password、host或是database name含有被URI視為特殊的字元(像是+, @, $, #, /, :, *, !),你必須對它進行編碼。請參考RFC 3986所列出的保留字元或urlencode函式來對它們編碼,在這種情況下,你需要移除檔案config/packages/doctrine.yaml裡的前綴resolve:,以避免錯誤url: '%env(resolve:DATABASE_URL)%'

現在你的連線參數已經設定好,Doctrine可以為你建立 db_name 資料庫。
php bin/console doctrine:database:create
config/packages/doctrine.yaml有更多選項可以設定,包括你的 server_version (e.g. 假設你使用MySQL5.7),會影響到Dontrine如何操作。

Doctrine有很多指令,執行php bin/console list doctrine可以知道所有指令。


建立一個實體類 Creating an Entity Class

假設你一個需要顯示商品的應用程式,就算不考慮Doctrine或資料庫,你也知道需要一個 Product 物件來代表那些產品。

你可以使用指令 make:entity 建立這個class和需要的欄位,這個指令會詢問你一些問題 - 請這樣回答它:
php bin/console make:entity

Class name of the entity to create or update:
> Product

 to stop adding fields):
> name

Field type (enter ? to see all types) [string]:
> string

Field length [255]:
> 255

Can this field be null in the database (nullable) (yes/no) [no]:
> no

 to stop adding fields):
> price

Field type (enter ? to see all types) [string]:
> integer

Can this field be null in the database (nullable) (yes/no) [no]:
> no

 to stop adding fields):
>
(press enter again to finish)
New in version 1.3: 指令 make:entity 互動式的行為在MakerBundle 1.3開始導入。

Woh!現在你有一個新檔案src/Entity/Product.php
// src/Entity/Product.php
namespace App\Entity;

use Doctrine\ORM\Mapping as ORM;

/**
 * @ORM\Entity(repositoryClass="App\Repository\ProductRepository")
 */
class Product
{
    /**
     * @ORM\Id
     * @ORM\GeneratedValue
     * @ORM\Column(type="integer")
     */
    private $id;

    /**
     * @ORM\Column(type="string", length=255)
     */
    private $name;

    /**
     * @ORM\Column(type="integer")
     */
    private $price;

    public function getId()
    {
        return $this->id;
    }

    // ... getter and setter methods
}
你對價格是整數感到困惑嗎?別擔心,這只是一個範例,但是將價格當作整數(e.g. 100 = $1USD)可以避免四捨五入的問題。

如果使用SQLite資料庫,你會看到底下的錯訊息:PDOException: SQLSTATE[HY000]: General error: 1 Cannot add a NOT NULL column with default value NULL,請新增設定屬性nullable=true來修正這個問題。

MySQL5.6使用InnDB table有limit of 767 bytes for the index key prefix,255字元的字串欄位和utf8mb4編碼會壓縮這個限制,這代表任何類型stringunique=true必須將最大值設為190,否則你將看到錯誤訊息:"[PDOException] SQLSTATE[42000]: Syntax error or access violation: 1071 Specified key was too long; max key length is 767 bytes"

這個類稱為"實體entity",待會兒你就可以儲存、從資料表 product 取得Product物件,每一個實體 Product 的屬性可以對應到一個資料表欄位,通常由註釋(annotations)完成:請看下面每一個屬性的註解@ORM\...


指令make:entity雖然可以讓事情變得簡單的工具,但新增移除欄位、新增移除方法或是更新設定都要自己寫。

Doctrine支援多樣的欄位種類,每種都有自己的選項,若要知道完整的清單,請看文件Doctrine's Mapping Types,如果你想要使用XML而非annotations,新增 type: xmldir:

請小心不要在資料表或是欄位名稱使用SQL的保留字(e.g. GROUP 或 USER),請看Doctrine Reserved SQL keywords documentation了解詳細如何跳脫這些,或者將資料表名稱改成@ORM\Table(name="groups"),或將欄位名稱設定name="group_name


Migrations: Creating the Database Tables/Schema

Product已經完全設定好,並且準備存到資料表product,如果你剛定義好這個class,資料庫實際上並沒有product這個資料表,如果要新增,你需要藉由剛剛已經安裝的DoctrineMigrationsBundle來完成:
php bin/console make:migration
如果成功,你將會看到下列的訊息像是:

SUCCESS!

Next: Review the new migration "src/Migrations/Version20180207231217.php" Then: Run the migration with php bin/console doctrine:migrations:migrate


如果你打開這個檔案,裡面包含更新資料庫的SQL,如果實行migrations執行這些SQL,指令:
php bin/console doctrine:migrations:migrate
與你的資料庫現況不衝突為原則,這個指令將執行所有migration檔案,在正式環境需要下指令來部屬,以確保正式環境的資料庫已經更新到最新版。


Migrations 和增加更多欄位

但如果你要在Product新增新的欄位,像是description,你可以編輯這個class、加入新的屬性。但是你也可以再次使用make:entity
php bin/console make:entity

Class name of the entity to create or update
> Product

 to stop adding fields):
> description

Field type (enter ? to see all types) [string]:
> text

Can this field be null in the database (nullable) (yes/no) [no]:
> no

 to stop adding fields):
>
(press enter again to finish)
多了新的屬性description,以及getDescription()setDescription()
// src/Entity/Product.php
// ...

class Product
{
    // ...

+     /**
+      * @ORM\Column(type="text")
+      */
+     private $description;

    // getDescription() & setDescription() were also added
}
此時新屬性仍不存在於資料表product,沒錯!產生新的migration吧
php bin/console make:migration
這次,產生的SQL看起來會像是這樣 :
ALTER TABLE product ADD description LONGTEXT NOT NULL
migration系統很聰明,它會自動比對所有實體在資料庫的現在的狀態,並產生需要的SQL來同步,如果先前的步驟,執行指令來觸發migrations:
php bin/console doctrine:migrations:migrate
這只會執行一個新的migration檔案,因為DoctrineMigrationBundle知道第一個migration已經在先前執行過,背後使用資料表 migration_versions 來追蹤這些紀錄。

每次修改你的schema,執行兩個指令來產生migration和實行migration,請確保commit這些migration檔案並且在部屬時執行。

如果你比較喜歡手動增加屬性,指令 make:entit 可以幫你產生getter和setter方法:
php bin/console make:entity --regenerate
如果你做了一些修正,並且想要重新產生所有的getter/setter方法,要加上--overwrite


將物件保存到資料庫 Persisting Objects to the Database

是時候把Product物件存到資料庫了!先建立一個新的控制器來試驗:
php bin/console make:controller ProductController
在控制器中,你可以建立新的Product物件,設定資料並保存。
// src/Controller/ProductController.php
namespace App\Controller;

// ...
use App\Entity\Product;
use Doctrine\ORM\EntityManagerInterface;
use Symfony\Component\HttpFoundation\Response;

class ProductController extends AbstractController
{
    /**
     * @Route("/product", name="create_product")
     */
    public function createProduct(): Response
    {
        // you can fetch the EntityManager via $this->getDoctrine()
        // or you can add an argument to the action: createProduct(EntityManagerInterface $entityManager)
        $entityManager = $this->getDoctrine()->getManager();

        $product = new Product();
        $product->setName('Keyboard');
        $product->setPrice(1999);
        $product->setDescription('Ergonomic and stylish!');

        // tell Doctrine you want to (eventually) save the Product (no queries yet)
        $entityManager->persist($product);

        // actually executes the queries (i.e. the INSERT query)
        $entityManager->flush();

        return new Response('Saved new product with id '.$product->getId());
    }
}
試試看!


恭喜你!你剛剛已經建立了第一行資料到product,為了證明成功建立,你可以直接從資料庫取出:
php bin/console doctrine:query:sql 'SELECT * FROM product'

# on Windows systems not using Powershell, run this command instead:
# php bin/console doctrine:query:sql "SELECT * FROM product"
請仔細看一下剛剛的範例:
  • line 18 方法$this->getDoctrine()->getManager()取得Doctrine實體管理員(entity manager)物件,也是Dontrine中最重要的物件,負責儲存物件到資料庫及從資料庫取得物件。
  • line 20-23 這個部分,$product物件如同其他一般的PHP物件使用。
  • line 26 persist($product) 呼叫Doctrine"管理"" $product 物件,這並不會對資料庫實際執行任何指令。
  • line 29 當方法 flush() 被呼叫時,Doctrine查看所有管理的物件,並判斷是否需要保存到資料庫。在這個範例中,$product物件在這個資料庫中不存在,所以entity manager會執行 INSERT ,新增一筆紀錄到資料表 product

如果呼叫flush()失敗,會拋出錯誤訊息Doctrine\ORM\ORMException,請參閱Transactions and Concurrency

不論是新增或更新物件,流程都是相同的:Doctrine能聰明地判斷要執行INSERT或是UPDATE你的實體。


驗證物件

The Symfony validator重複利用Doctrine metadata實現一些基礎的驗證任務:
namespace App\Controller;

use App\Entity\Product;
use Symfony\Component\HttpFoundation\Response;
use Symfony\Component\Validator\Validator\ValidatorInterface;
// ...

class ProductController extends AbstractController
{
    /**
     * @Route("/product", name="create_product")
     */
    public function createProduct(ValidatorInterface $validator): Response
    {
        $product = new Product();
        // This will trigger an error: the column isn't nullable in the database
        $product->setName(null);
        // This will trigger a type mismatch error: an integer is expected
        $product->setPrice('1999');

        // ...

        $errors = $validator->validate($product);
        if (count($errors) > 0) {
            return new Response((string) $errors, 400);
        }

        // ...
    }
}
雖然 Product 並未定義任何明確的驗證設定(validation configuration),Symfony針對Dontrice對應設置進行審視,進而推斷一些驗證規則。例如,屬性name在資料庫不能為null,因為這個屬性已經自動加入NotNull constraint這個限制(若此屬性尚未有此限制)。

下面的表格統整了Symfony會自動加入的Doctrine metadata和驗證限制的應對關係:

Dontrine屬性(attribute) 驗證限制 備註
nullable=false NotNull 需要安裝PropertyInfo component
type Type 需要安裝PropertyInfo component
unique=true UniqueEntity
length Length

因為表單元件和API平台內部使用驗證元件,因此所有的表單和Web API都會因為自動化的驗證限制受惠。

自動驗證能夠讓寫程式更加有效率,是一個很棒的特色,但這無法完全取代驗證設定,你依然需要加入驗證限制(validation constraints)來保證提供給使用者的資料都是正確的。

New in version 4.3: Symfony 4.3開始使用自動化驗證。


從資料庫取得物件 Fetching Objects from the Database

從資料庫取得物件很簡單,假設你可以到 /product/1 看你的新商品:
// src/Controller/ProductController.php
// ...

/**
 * @Route("/product/{id}", name="product_show")
 */
public function show($id)
{
    $product = $this->getDoctrine()
        ->getRepository(Product::class)
        ->find($id);

    if (!$product) {
        throw $this->createNotFoundException(
            'No product found for id '.$id
        );
    }

    return new Response('Check out this great product: '.$product->getName());

    // or render a template
    // in the template, print things with {{ product.name }}
    // return $this->render('product/show.html.twig', ['product' => $product]);
}
打開瀏覽器看看!


當你要取得特定物件,你就會用到"知識庫(repository)",你可以想成repository就像是一個PHP class,它唯一個工作就是幫你找出某一類(class)的實體(entity)。

一旦有repository物件,你有需要好用的方法:
$repository = $this->getDoctrine()->getRepository(Product::class);

// look for a single Product by its primary key (usually "id")
$product = $repository->find($id);

// look for a single Product by name
$product = $repository->findOneBy(['name' => 'Keyboard']);
// or find by name and price
$product = $repository->findOneBy([
    'name' => 'Keyboard',
    'price' => 1999,
]);

// look for multiple Product objects matching the name, ordered by price
$products = $repository->findBy(
    ['name' => 'Keyboard'],
    ['price' => 'ASC']
);

// look for *all* Product objects
$products = $repository->findAll();
你可以客製方法來執行更複雜的queries,更多請看章節Querying for Objects: The Repository

在HTML頁面的正下方,除錯工具列(debug toolbar)會顯示query執行的數量和時間。
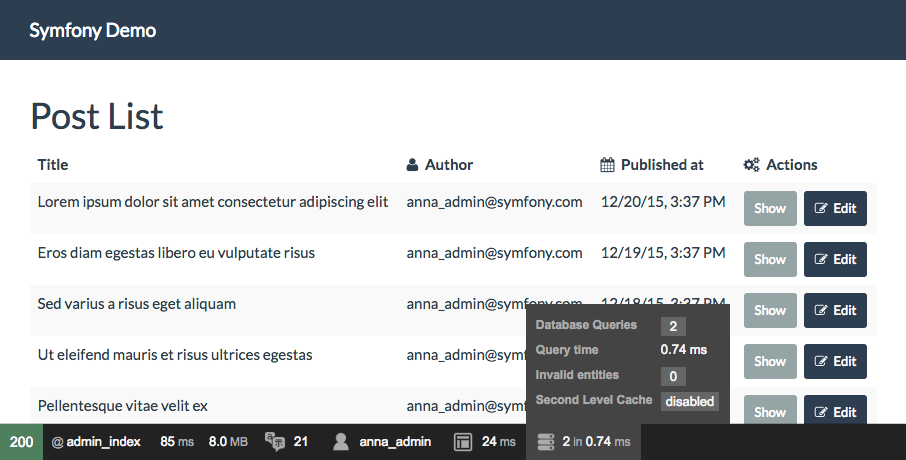

若query數量過多,符號顯示黃色來表示可能有些錯誤發生,點選符號打開Symfony Profiler去看實際執行的queries,如果你沒看到除錯工具列,請執行指令composer require --dev symfony/profiler-pack進行安裝。


自動取得物件 Automatially Fetching Objects (ParamConverter)

在很多狀況時,你可以使用SensioFrameworkExtraBundle來幫你自動執行query!首先,安裝bundle以防你沒有:
composer require sensio/framework-extra-bundle
現在,簡化你的控制器:
// src/Controller/ProductController.php
use App\Entity\Product;

/**
 * @Route("/product/{id}", name="product_show")
 */
public function show(Product $product)
{
    // use the Product!
    // ...
}
就是這樣!這個套件(bundle)使用路由(route)中的 {id} 來query Productid 欄位,如果查無資訊,則顯示404頁面。

還有很多選擇可以使用,請參閱ParamConverter了解更多。


更新物件

一旦你從Doctrine獲得一個物件,你可以如同PHP model一樣與其互動:
/**
 * @Route("/product/edit/{id}")
 */
public function update($id)
{
    $entityManager = $this->getDoctrine()->getManager();
    $product = $entityManager->getRepository(Product::class)->find($id);

    if (!$product) {
        throw $this->createNotFoundException(
            'No product found for id '.$id
        );
    }

    $product->setName('New product name!');
    $entityManager->flush();

    return $this->redirectToRoute('product_show', [
        'id' => $product->getId()
    ]);
}
使用Doctrine來編輯既有的product共有三個步驟:
  1. 從Donctrine獲取物件
  2. 修改物件
  3. 呼叫實體管理者(entity manager)的flush()
你可以呼叫 $entityManager->persist($product) ,但這不重要,因為Doctrine已經知道你物件的改變。


刪除物件

刪除物件的方法也非常相似,但是需要呼叫方法 remove() 通知Doctrine你想要從資料庫刪除這個給定的物件,DELETE指令不會真正被執行,直到呼叫方法 flush()


Querying for Objects: The Repository

你已經見識過repository物件如何不費工夫地讓你執行一些基礎queries:
// from inside a controller
$repository = $this->getDoctrine()->getRepository(Product::class);

$product = $repository->find($id);
但是如果你需要更複雜的query呢?當你執行 make:entity 來產生你的實體(entity),同時會產生類(class) ProductRepository
// src/Repository/ProductRepository.php
namespace App\Repository;

use App\Entity\Product;
use Doctrine\Bundle\DoctrineBundle\Repository\ServiceEntityRepository;
use Doctrine\Common\Persistence\ManagerRegistry;

class ProductRepository extends ServiceEntityRepository
{
    public function __construct(ManagerRegistry $registry)
    {
        parent::__construct($registry, Product::class);
    }
}
當你取得repository(i.e. ->getRepository(Product::class)),它是真正的物件實體!這是因為 repositoryClass 設定已經在 entity class的最上面產生。

假設你要query所有大於某個價格的商品物件,在你的repository新增新的方法:
// src/Repository/ProductRepository.php

// ...
class ProductRepository extends ServiceEntityRepository
{
    public function __construct(ManagerRegistry $registry)
    {
        parent::__construct($registry, Product::class);
    }

    /**
     * @param $price
     * @return Product[]
     */
    public function findAllGreaterThanPrice($price): array
    {
        // automatically knows to select Products
        // the "p" is an alias you'll use in the rest of the query
        $qb = $this->createQueryBuilder('p')
            ->andWhere('p.price > :price')
            ->setParameter('price', $price)
            ->orderBy('p.price', 'ASC')
            ->getQuery();

        return $qb->execute();

        // to get just one result:
        // $product = $qb->setMaxResults(1)->getOneOrNullResult();
    }
}
這使用到Doctrine的Query Builder,它是非常強大且有用戶友善的方法客製queries,現在你可以呼叫repository的這個方法:
// from inside a controller
$minPrice = 1000;

$products = $this->getDoctrine()
    ->getRepository(Product::class)
    ->findAllGreaterThanPrice($minPrice);

// ...
如果你需要將Service/Config加入(inject)服務中(Injecting Services/Config into a Service),則可以輸入提示class ProductRepository,並像平常一樣將其注入(inject)。

若要瞭解更多細節,請看Doctrine文件Query Builder


Querying with DQL or SQL

除了query產生器之外,你還可以使用Doctrine Query Language進行query:
// src/Repository/ProductRepository.php
// ...

public function findAllGreaterThanPrice($price): array
{
    $entityManager = $this->getEntityManager();

    $query = $entityManager->createQuery(
        'SELECT p
        FROM App\Entity\Product p
        WHERE p.price > :price
        ORDER BY p.price ASC'
    )->setParameter('price', $price);

    // returns an array of Product objects
    return $query->execute();
}
如果有需要也可以直接使用SQL:
// src/Repository/ProductRepository.php
// ...

public function findAllGreaterThanPrice($price): array
{
    $conn = $this->getEntityManager()->getConnection();

    $sql = '
        SELECT * FROM product p
        WHERE p.price > :price
        ORDER BY p.price ASC
        ';
    $stmt = $conn->prepare($sql);
    $stmt->execute(['price' => $price]);

    // returns an array of arrays (i.e. a raw data set)
    return $stmt->fetchAll();
}
若使用SQL,你將取得資料列(raw data);而非物件(除非你使用NativeQuery)。


設定

請看Doctrine config reference


關聯性(Relationships and Associations)

Doctrine提供管理資料庫關聯性的所有功能(被稱謂associations),包含ManyToOne、OneToMany、OneToOne和ManyToMany關係。


虛擬資料裝置(Dummy Data Fixtures)

Doctrine提供函式庫(library)讓你可以載入測試資料道專案裡(i.e. "fixture data"),安裝方式:
composer require --dev doctrine/doctrine-fixtures-bundle
接者使用指令make:fixtures來產生空的fixture class:
php bin/console make:fixtures

The class name of the fixtures to create (e.g. AppFixtures):
ProductFixture
客製化新的class來載入物件 Product 到Doctrine:
// src/DataFixtures/ProductFixture.php
namespace App\DataFixtures;

use Doctrine\Bundle\FixturesBundle\Fixture;
use Doctrine\Common\Persistence\ObjectManager;

class ProductFixture extends Fixture
{
    public function load(ObjectManager $manager)
    {
        $product = new Product();
        $product->setName('Priceless widget!');
        $product->setPrice(14.50);
        $product->setDescription('Ok, I guess it *does* have a price');
        $manager->persist($product);

        // add more products

        $manager->flush();
    }
}
清空資料庫並重新仔入所有的fixure classes:
php bin/console doctrine:fixtures:load
若要取得更多資料,請看文件DoctrineFixturesBundle


資料翻譯自:
https://symfony.com/doc/4.3/doctrine.html

系列文章: