2019年1月23日 星期三

[Vue.js] 父子元件的雙向溝通,簡單的props和emit使用範例


第一部分、利用props將資料傳給components使用 (父元件→子元件)
1. 子元件的設定
首先有一個子元件(child component),我們設定一個propsuserName,型態為String,如果data內的參數,你可以直接在模板裡用{{ userName }}印出,或在function內以this.userName來進行操作。
template的內容是以顯示userName在一個HTML的輸入框裡
// Child Component
Vue.component("child-input", {
  template: `
    <div>
      <label>Name</label>
      <input v-model="childUserName" type="text"/>
    </div>
  `,
  props: {
    // camelCase in JavaScript
    userName: String
  },
  data: function() {
    return {
      childUserName: this.userName
    };
  }
});
※Vue會警告你盡量不要直接修改props參數的值,因此我們設定了childUserName來避免這個問題。
警告內容:
"Avoid mutating a prop directly since the value will be overwritten whenever the parent component re-renders. Instead, use a data or computed property based on the prop's value."

2. 父元件的設定
在HTML裡要用user-name來傳值,也就是說component的命名法遵循camelCase,到HTML內時則是用kebab-case來識別。
user-name和:user-name兩者的用法不同,如果是user-name="initial_input",會把"initial_input"當成字串傳過去,如果前面加上冒號「:」變成:user-name="inital_input",則是把inital_input這個參數的值傳過去。
// HTML
<div id="app">
  <!-- kebab-case in HTML -->
  <child-input :user-name="initial_input"></child-input>
</div>
// JS
new Vue({
  el: "#app",
  data: function() {
    return {
      initial_input: "Annie",
    };
  }
});


第二部分、利用emit將components的資料回傳 (子元件→父元件)
1. 子元件的設定
延續第一部分,我們在methods內新增一個sendToParent的function,@input="sendToParent"代表我們觸發的時機。
看一下sendToParent內容,$emit後面第一個參數"update-text",代表設定一個update-text的事件,第二參數是同時把childUserName這個參數傳出去,如果需要傳更多的參數,直接用逗號分隔接在後面。
Vue.component("child-input", {
  template: `
    <div class="form-group mt-3">
      <label>Name</label>
      <input v-model="childUserName" @input="sendToParent" type="text"/>
    </div>
  `,
  props: {
    userName: String
  },
  data: function() {
    return {
      childUserName: this.userName
    };
  },
  methods: {
    sendToParent: function() {
      this.$emit("update-text", this.childUserName);
    }
  }
});

2. 父元件的設定
父元件的部分也新增一個getChildText的function來接收子元件的資料,當子元件觸發'update-text'時,就會執行getChildText來接收傳送的值,value就是從子元件傳來的childUserName。如果傳多個值,記得在這邊填相應數量的參數來接收。
// JS
new Vue({
  el: "#app",
  data: function() {
    return {
      initial_input: "Annie",
    };
  },
  methods: {
    getChildText: function(value) {
      this.initial_input = value;
    }
  }
});
// HTML
<div id="app">
  <child-input :user-name="initial_input" 
               @update-text="getChildText"></child-input>
</div>


完整的程式碼請參考codepen上的範例:

See the Pen
Sending Messages between Parent and Child
by chenuin (@chenuin)
on CodePen.


相關文章:
2019年1月10日 星期四

[Django] Ubuntu+Apache2+mod_wsgi 部屬Django專案


在開發階段習慣用內建的runserver來啟動Django專案,但官方不建議在正式環境使用,以下介紹如何用ubuntu上安裝apache2和相關的套件來啟動專案,這樣最大的好處就是伺服器開啟時,可以由apache2自動將專案啟動。

Step1. 建立Django專案
※如果已經有現有專案,可以跳過這個步驟。
a. 建立一個獨立的虛擬環境(相關文章:[Python] Virtualenv基本操作)
$ sudo apt install python3-pip
$ sudo pip3 install virtualenv
$ mkdir web_project
$ cd web_project
$ virtualenv env --no-site-packages
b. 安裝Django、新增專案
$ source env/bin/activate
$ pip3 install django
$ django-admin.py startproject myproject .
c. 請在settings.py加上伺服器本身的IP,在開發階段可以用*代替。STATIC_ROOT這行本來在檔案裏面沒有,要手動自己加上去。
# myproject/settings.py
ALLOWED_HOSTS = ["*"]
...
STATIC_ROOT = os.path.join(BASE_DIR, "static/")
d. 加入static的檔案
$ python3 manage.py collectstatic
成功之後資料夾內會多一個static的目錄。
※關於STATIC_ROOT的說明,可以參考『[Django] 如何設定static files(css, javascript, images)』。


Step2. 安裝Apache、mod_wsgi
python2和python3兩者擇一,請注意Django升級到2.0後就不再支援python2了,建議使用python3喔!
# python3
$ sudo apt update
$ sudo apt install apache2 libapache2-mod-wsgi-py3

# python2
$ sudo apt update
$ sudo apt install apache2 libapache2-mod-wsgi
如果希望重開伺服器時,apache2可以自動啟動,請執行下面指令。
$ sudo systemctl enable apache2
完成安裝後,可以在 http://localhost/ 看到apache預設的首頁。


Step3. 設定apache
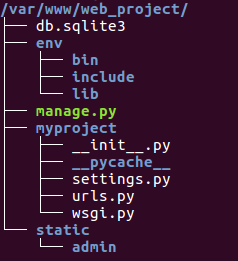
請先參考一下目前的目錄架構

新建一個Apache的config檔,加入這一段:
# /etc/apache2/sites-available/django.conf
<VirtualHost *:80>
    DocumentRoot /var/www/web_project

    Alias /static /var/www/web_project/static
    <Directory /var/www/web_project/static>
        Require all granted
    </Directory>

    <Directory /var/www/web_project/myproject>
        <Files wsgi.py>
            Require all granted
        </Files>
    </Directory>

    WSGIDaemonProcess myproject python-path=/var/www/web_project python-home=/var/www/web_project/env
    WSGIProcessGroup myproject
    WSGIScriptAlias / /var/www/web_project/myproject/wsgi.py

</VirtualHost>

預設只會讀取default內的設定,請記得啟用自訂的django.conf,並停用default的設定。
$ sudo a2ensite django.conf
$ sudo a2dissite 000-default.conf
$ sudo service apache2 reload
打開 http://localhost/ 就可以看到網站了。


參考資料:
https://www.digitalocean.com/community/tutorials/how-to-serve-django-applications-with-apache-and-mod_wsgi-on-ubuntu-14-04

2019年1月6日 星期日

[Vue.js] 安裝vue-resource執行POST, GET


vue官方之前推薦使用vue-resource套件來執行HTTP Request,不過vue更新到2.0之後,作者就宣告不再更新vue-resource,目前漸漸被axios取代。所以這篇只是做為紀錄性質,寫一下使用vue-resource的方法。

請先用指令npm安裝vue-resource
$ npm install vue-resource

先在專案中加入這個套件
# src/main.js
import VueResource from 'vue-resource'
Vue.use(VueResource)

請根據需求設定{URL} {BODY} {HEADER}

1. GET
this.$http({
 url: {URL},
 method: 'GET',
 body: {},
 headers: {HEADER}
 }).then(function (response) {
  console.log('success');
 }, function (response) {
  console.log('fail');
});

2. POST
this.$http.post({URL}, {BODY}, {HEADER}).then(
 function (response) {
  console.log('success');
 }, function (response) {
  console.log('fail');
});
this.$http({
 url: {URL},
 method: 'POST',
 body: {BODY},
 headers: {HEADER}
 }).then(function (response) {
  console.log('success');
 }, function (response) {
  console.log('fail');
});

2019年1月4日 星期五

[Vue.js] vue-router設定history mode移除網址的#


Vue預設的router模式是hash mode,所以我們能設定成history mode,來去除URL中的#(hashtag),但是除了http://localhost/ 首頁能夠正常顯示,直接打開其他網址會出現404 page no found的錯誤訊息。

const router = new VueRouter({
  mode: 'history',
  routes: [...]
})

也就是說其實在vue專案裡面實際存在的只有index.html這個頁面,我們必須透過apache設定,將其他網址導到index.html,就能用所有的URL正常的顯示網頁。


Ubuntu設定方式

方法一、mod_rewrite模組
1. 請先確定已經啟用mod_rewrite 模組
$ sudo a2enmod rewrite

2. 編輯apache的config
# /etc/apache2/sites-available/000-default.conf
<VirtualHost *:80>
    ...
    <Directory /var/www/html>
        Options Indexes FollowSymLinks
        AllowOverride All
        Require all granted
    </Directory>
</VirtualHost>

3. 在專案目錄下新增檔案.htaccess
# /var/www/html/.htaccess
<IfModule mod_rewrite.c>
  RewriteEngine On
  RewriteBase /
  RewriteRule ^index\.html$ - [L]
  RewriteCond %{REQUEST_FILENAME} !-f
  RewriteCond %{REQUEST_FILENAME} !-d
  RewriteRule . /index.html [L]
</IfModule>

目錄架構如下
/var/www/html
├── .htaccess
├── index.html
└── static

4. 重啟apache2
$ sudo systemctl restart apache2


方法二、FallbackResource
與方法一相同,只是.htaccess內容改用fallbackresource,目的一樣是改寫URL導向index.html。
# /var/www/html/.htaccess
FallbackResource /index.html
存檔後再重啟apache2就大功告成囉!


參考資料:
https://router.vuejs.org/guide/essentials/history-mode.html#example-server-configurations