顯示具有 python 標籤的文章。 顯示所有文章

2021年10月1日 星期五

如何將 Github 專案部屬到 Heroku (Creating a 'Deploy to Heroku' Button)

先前「[django] 將Django專案部署到Heroku」提到如何一步一步建立 Django 專案,並部屬到 Heroku。若是Github現有的專案已經滿足 Heroku 基本所需的設定,可以透過網頁操作,將現有專案快速地複製到 Heroku 上。

操作說明使用 heroku-startup-settings 這個專案 ,可以到 Github 查看完整的程式碼。首先,Github專案必須在根目錄先建立 app.json 這個檔案:

{
  "name": "Heroku startup settings",
  "description": "Getting started with Django project",
  "repository": "https://github.com/chenuin/heroku-startup-settings",
  "logo": "https://node-js-sample.herokuapp.com/node.png",
  "keywords": ["heroku", "python", "django"]
}
(app.json)

內容很好理解,檔案沒有必填的欄位,通常會寫namedescriptionlogo有助於其他人理解這個專案的內容或目的,更多的設定可以參考 app.json schema

其中設定環境參數 env 應該是最常使用的,可以依照需求調整部屬。


app.json 正確建立後,就可以開啟這個連結。
https://heroku.com/deploy?[REPO_WEB_URL]/tree/[BRANCH_NAME]
請替換專案的路徑和分支名稱,因此連結為:

接者可以在 README.md 新增這段文字,
[![Deploy](https://www.herokucdn.com/deploy/button.svg)](https://heroku.com/deploy?template=https://github.com/chenuin/heroku-startup-settings/tree/master)

請記得替換成自己的連結,按鈕效果就像這樣:

Deploy

點選按鈕開啟連結並填寫專案名稱,按下「Deploy app」,就會自動在 Heroku 建立一個一樣的新專案。


相關文章:

[django] 將Django專案部署到Heroku

參考資料:

https://devcenter.heroku.com/articles/heroku-button https://devcenter.heroku.com/articles/app-json-schema

2020年5月1日 星期五

ubuntu18 + python2 文件編輯 AsciiDoc 安裝說明


基本上 AsciiDoc 已經停止更新,2017年已經發布了最終版本,並表示不再更新,當然 asciidoc 仍可繼續使用,直到停止支援 python2。既然都明寫建議用戶轉移使用 Asciidoctor(底層是Ruby) 或支援 Python3 的 asciidoc-py3,以下安裝步驟僅作為紀錄。

安裝之前請先確保主機已經安裝了Python(版本2.4以上),因為安裝的腳本是用Python寫的,多數的linux系統都已經內建,所以可以直接開始按照指令安裝asciidoc。

以下操作環境為ubuntu 18.04(server),目前ubuntu 20.04 LTS (2020/04 - 2025/04)為最新 LTS 版,但不影響下面的操作:

方法一
Step1. 下載原始碼
透過git下載原始碼,選用的版本為8.6.9
cd /bin
git clone https://github.com/asciidoc/asciidoc asciidoc-8.6.9

cd asciidoc-8.6.9
git checkout 8.6.9

Step2. 綁定指令
哈囉
(A) 綁定指令
ln -s /bin/asciidoc-8.6.9/asciidoc.py /bin/asciidoc
ln -s /bin/asciidoc-8.6.9/a2x.py /bin/a2x
(B) 編譯
autoconf
./configure
make
sudo make install


方法二
更快速的方法,可直接透過AsciiDoc Debian package安裝,指令:
apt install asciidoc

Official Site: http://asciidoc.org/

2019年3月28日 星期四

[GCP] 讓Google Vision API幫你做ORC文字辨識(Python實例)


一、GCP設定
啟用方式
打開連結,點選『啟用』。

每個月有提供免費額度(詳細請看google的說明),每月使用的前 1,000 個單位免費,如果怕被收費的話記得關閉這個API。

關閉的方法
(1) 點選『管理』

(2) 點選『停用API』


二、安裝套件
(1) 安裝vision
pip3 install google-cloud-vision

(2) 安裝sdk
方法一、
pip3 install google-cloud-sdk
方法二、
sudo apt install snapd
sudo snap install google-cloud-sdk --classic


三、使用方式
(1) 輸入指令,獲得授權。
gcloud auth application-default login
點選出現的連結(用瀏覽器打開),選擇你的google帳戶登入。
登入google後,把出現的驗證碼回填。
記得!伺服器重開之後都要再重新登入。

(2) 新建檔案,執行程式。
# detect.py
import sys
import io
from google.cloud import vision

def detect_text_uri(uri):
    client = vision.ImageAnnotatorClient()
    image = vision.types.Image()
    image.source.image_uri = uri

    response = client.text_detection(image=image)
    texts = response.text_annotations
    print('Texts:')
    print(texts[0].description)

if __name__ == '__main__':
    detect_text_uri(sys.argv[1])
執行程式碼
python3 detect.py IMAGE_URL

[實測結果]
python3 detect.py https://www.eastcoast-nsa.gov.tw/image/6921/1024x768
圖片來源:https://www.eastcoast-nsa.gov.tw/image/6921/1024x768

輸出文字:


Google Vision Api Example
Vision API支援很多國的語言,辨識度也相當不錯!Google有針對Vision API提供很多範例的程式碼,你可以[下載]程式碼來玩玩看。
document_text 標示圖片中的文字 [連結]
python3 doctext.py resources/text_menu.jpg  -out_file result.png
將圖片中的文字標示出來。

解析圖片的內容、計算評分 web [連結]
python3 web_detect.py https://picsum.photos/400?image=111
除了解析圖片的內容,還會列出使用這個圖片的網站、與此圖片相同的圖片(不同路徑)、部分相同的圖片等等。


參考資料:
https://cloud.google.com/vision/overview/docs/
https://cloud.google.com/vision/docs/quickstart-client-libraries#client-libraries-install-python

2019年1月10日 星期四

[Django] Ubuntu+Apache2+mod_wsgi 部屬Django專案


在開發階段習慣用內建的runserver來啟動Django專案,但官方不建議在正式環境使用,以下介紹如何用ubuntu上安裝apache2和相關的套件來啟動專案,這樣最大的好處就是伺服器開啟時,可以由apache2自動將專案啟動。

Step1. 建立Django專案
※如果已經有現有專案,可以跳過這個步驟。
a. 建立一個獨立的虛擬環境(相關文章:[Python] Virtualenv基本操作)
$ sudo apt install python3-pip
$ sudo pip3 install virtualenv
$ mkdir web_project
$ cd web_project
$ virtualenv env --no-site-packages
b. 安裝Django、新增專案
$ source env/bin/activate
$ pip3 install django
$ django-admin.py startproject myproject .
c. 請在settings.py加上伺服器本身的IP,在開發階段可以用*代替。STATIC_ROOT這行本來在檔案裏面沒有,要手動自己加上去。
# myproject/settings.py
ALLOWED_HOSTS = ["*"]
...
STATIC_ROOT = os.path.join(BASE_DIR, "static/")
d. 加入static的檔案
$ python3 manage.py collectstatic
成功之後資料夾內會多一個static的目錄。
※關於STATIC_ROOT的說明,可以參考『[Django] 如何設定static files(css, javascript, images)』。


Step2. 安裝Apache、mod_wsgi
python2和python3兩者擇一,請注意Django升級到2.0後就不再支援python2了,建議使用python3喔!
# python3
$ sudo apt update
$ sudo apt install apache2 libapache2-mod-wsgi-py3

# python2
$ sudo apt update
$ sudo apt install apache2 libapache2-mod-wsgi
如果希望重開伺服器時,apache2可以自動啟動,請執行下面指令。
$ sudo systemctl enable apache2
完成安裝後,可以在 http://localhost/ 看到apache預設的首頁。


Step3. 設定apache
請先參考一下目前的目錄架構

新建一個Apache的config檔,加入這一段:
# /etc/apache2/sites-available/django.conf
<VirtualHost *:80>
    DocumentRoot /var/www/web_project

    Alias /static /var/www/web_project/static
    <Directory /var/www/web_project/static>
        Require all granted
    </Directory>

    <Directory /var/www/web_project/myproject>
        <Files wsgi.py>
            Require all granted
        </Files>
    </Directory>

    WSGIDaemonProcess myproject python-path=/var/www/web_project python-home=/var/www/web_project/env
    WSGIProcessGroup myproject
    WSGIScriptAlias / /var/www/web_project/myproject/wsgi.py

</VirtualHost>

預設只會讀取default內的設定,請記得啟用自訂的django.conf,並停用default的設定。
$ sudo a2ensite django.conf
$ sudo a2dissite 000-default.conf
$ sudo service apache2 reload
打開 http://localhost/ 就可以看到網站了。


參考資料:
https://www.digitalocean.com/community/tutorials/how-to-serve-django-applications-with-apache-and-mod_wsgi-on-ubuntu-14-04

2018年11月18日 星期日

[Github] 用Django專案示範如何使用Travis CI自動測試


開始之前請先到Travis CI[官網]用Github帳號登入
同步github上的專案,並啟動需要測試的專案(Repository)!

請在根目錄新建檔案.travis.yml
使用語言為python,並用3.5和3.6版本。
language: python
python:
  - "3.5"
  - "3.6"

env則是設定這個腳本中的參數,後面install則是安裝這個專案所需的套件。
env:
  - DJANGO_VERSION=2.1
  - DJANGO_VERSION=2.1.2
# command to install dependencies
install:
  - pip install -q Django==$DJANGO_VERSION
  - pip install -r requirements.txt

針對這個專案我寫了一段測試(連結),script就是執行裡面預先寫好的元件測試。
script: python manage.py test

上傳Github後,可以看到測試的結果,我們分別設定了2個版本的python、2個版本Django,所以會產生4個執行結果,就不需要一一下載各個版本來進行測試囉!

如果測試成功會顯示passing,若失敗會顯示failing,我在readme.md加上的標誌方便知道結果,新增方法請參考下面:


完整檔案如下(連結):
# .travis.yml
language: python
python:
  - "3.5"
  - "3.6"
env:
  - DJANGO_VERSION=2.1
  - DJANGO_VERSION=2.1.2
# command to install dependencies
install:
  - pip install -q Django==$DJANGO_VERSION
  - pip install -r requirements.txt
# command to run tests
script: python manage.py test

完整專案請到Github(連結)下載。

2018年10月29日 星期一

[Django] 內建管理系統(Admin)使用技巧


Django內建的管理系統,就類似phpmyadmin一樣,可以用網頁的方式來管理資料庫,請先確定urls.py內已經加入這個路徑。
# project/urls.py
from django.contrib import admin
from django.urls import path

urlpatterns = [
    path('admin/', admin.site.urls),
]

請先執行migrate,建立一個後臺使用者的資料表,再新增一個使用者來登入後台介面。
# apply admin models
python manage.py migrate

# create a user to login as admin
python manage.py createsuperuser

打開瀏覽器'http://your-ip-address/admin'就可以看到管理介面的登入畫面,請輸入剛剛設定的帳號密碼。

首先,建立一個models紀錄產品(Product)的資訊:
# myapp.models.py
class Product(models.Model):
    name = models.CharField(max_length=128)
    price = models.DecimalField(max_digits = 11, decimal_places = 2)
    count = models.IntegerField()
    created = models.DateTimeField(auto_now_add=True)
請執行以下指令,讓這個models生效,makemigrations的目的是將models.py的內容轉成sql,若models.py有任何異動,可以透過migrations針對修改的部分進行更新。migrate則是執行sql,也就是實際建立新的table。
python manage.py makemigrations
python manage.py migrate

執行結果請參考

方法一、
最簡單的使用方式,就是在admin.py註冊這個models。
# myapp/admin.py
from django.contrib import admin
from .models import Product

admin.site.register(Product)

此時,管理介面會多一個你註冊資料表Product。另外,上面的User則是一開始新增的superuser儲存的資料表。

新增資料後,預設的畫面如下,括號內的數字是自動遞增的ID,必須點開才能知道其他資訊,不方便管理。

方法二、
同方法一在admin.py內註冊models,此外我們重新定義回傳值,不再顯示流水編號,舉例我們能回傳產品名稱(name)。
# myapp.models.py
class Product(models.Model):
    name = models.CharField(max_length=128)
    price = models.DecimalField(max_digits = 11, decimal_places = 2)
    count = models.IntegerField()
    created = models.DateTimeField(auto_now_add=True)

    def __str__(self):
        # value to display
        return str(self.name)

效果如下:


方法三、
# myapp/admin.py
from django.contrib import admin
from .models import Product

class ProductAdmin(admin.ModelAdmin):
    # fields to display
    list_display = ('id', 'name', 'price', 'created')

admin.site.register(Product, ProductAdmin)

效果如下:


進階使用

[Django] 如何設定static files(css, javascript, images)


請確定設定檔內的參數,通常已經預設寫入。
# project/settings.py
INSTALLED_APPS = [
    ...
    'django.contrib.staticfiles',
]

STATIC_URL = '/static/'
接下來,分此兩種情形:

(1) 開發階段 (DEBUG=True)
首先,在開發階段時,因為static files經常性的修改,因此先讀取STATICFILES_DIRS的設定。
# project/settings.py
DEBUG = True

STATICFILES_DIRS = [
    os.path.join(BASE_DIR, "static"),
    # another directory ...
]


建立一個新的static資料夾,在裡面依照習慣將檔案分類放好,可以參考一下我的分類方式:

當在templates中要使用static資料夾內的資源,請記得加入tag。
# templates/index.html
{% load static %}
<img src="{% static 'images/example.png' %}" alt="My image" />


(2) 佈建正式環境 (DEBUG=False)
在正式環境時,請加入STATIC_ROOT的設定,請注意STATIC_ROOT與STATICFILES_DIRS的名稱不能重複!只要Debug設為False,一定要加入這個設定,否則網頁無法正常開啟。
# project/settings.py
DEBUG = False

STATIC_ROOT = os.path.join(BASE_DIR, "staticfiles")

接著,請執行指令,將static裡面的資料輸出到新的資料夾staticfiles內。
python manage.py collectstatic
此時,觀察一下兩個資料夾差別,會發現staticfiles內除了我們自己新增的images,Django內建的admin或其他套件所需的資源,都會一並新增至此。但因為js和css兩個資料夾是空的,所以載入時會被忽略。


若之後static資料夾內有任何修改,必須重複執行collectstatic的指令來更新。


【重點整理】比較三個相似參數的差別
1. STATIC_URL:
設定static files的URL前綴,按照設定的前綴+路徑、檔名產生URL,以本文example.png為例,STATIC_URL='/static/',因此透過URL 'http://your-ip-address/static/images/example.png'檢視example.png這個檔案。

2. STATICFILES_DIRS:
開發階段,static files存放的位置,可以寫入多個路徑。

3. STATIC_ROOT:
正式環境中,透過collectstatic指令,將STATICFILES_DIRS設定目錄下檔案,收錄到STATIC_ROOT指定目錄。

2018年10月4日 星期四

[Django] 支援多國語言的網站

internationalization(國際化)被簡寫為i18n,因為字首i和字尾n的中間共有18個字母。

安裝相關軟體
sudo apt-get install gettext

修改settings.py,在MIDDLEWARE加上所需的套件,LANGUAGES列出支援哪些語言,LOCALE_PATHS則是將語言的翻譯包儲存的路徑。
# project/settings.py
MIDDLEWARE = [
    ...,

    'django.middleware.locale.LocaleMiddleware',
]


LANGUAGES = (
    ('zh-tw', '繁體中文'),
    ('en', 'English'),
)
LOCALE_PATHS = (
    os.path.join(BASE_DIR, 'locale'),
)

新增一個html的模板,記得加入i18n的tag,頁面內想翻譯的字詞標註起來。另外在url的設定裡,將所有頁面區分成多個語言,也就是原先的路徑http://your.ip.address/welcome,可由http://your.ip.address/en/welcome來檢視英文版網站,中文網站則是打開http://your.ip.address/zh-tw/welcome。
# templates/index.html
{% load i18n %}

{% trans '一起唱DoReMi' %}
設定url
# myapp/views.py
def index(request):
    return render(request, 'index.html', {})

# project/urls.py
from myapp import views
from django.conf.urls.i18n import i18n_patterns
urlpatterns = i18n_patterns(
    path('', views.index, name='index'),
)

標註好想翻譯的字詞或段落後,請透過下列指令產生翻譯文件。
python manage.py makemessages -l en
python manage.py makemessages -l zh_TW

此時在locale資料夾內,會找到產生的檔案,msgid是你標註的字詞,請在msgstr寫入翻譯。針對重複的id,在文件內只能設定一種翻譯。
# locale\en\LC_MESSAGES\django.po
msgid "一起唱DoReMi"
msgstr "singing DoReMi together"
# locale\zh_TW\LC_MESSAGES\django.po
msgid "一起唱DoReMi"
msgstr "一起唱DoReMi"

翻譯完成後,將翻譯包編譯出*.mo
python manage.py compilemessages -l en
python manage.py compilemessages -l zh_TW
可以參考一下完成編譯的檔案結構
locale/
├── en
│   └── LC_MESSAGES
│       ├── django.mo
│       └── django.po
└── zh_TW
    └── LC_MESSAGES
        ├── django.mo
        └── django.po

4 directories, 4 files

這時就可以開啟瀏覽器查看成果囉!
http://your.ip.address/en/
http://your.ip.address/zh-tw/

2018年9月28日 星期五

[Django] 如何將Django專案與MariaDB、mysql連線

一般Django專案會使用內建的sqlite3當作資料庫
只要安裝相關套件 Django也是可以支援mariaDB、mysql

一、環境建置
首先安裝需要的軟體,mysql和mariadb二擇一即可。
sudo apt-get update
# mysql
sudo apt-get install mysqldb-server libmysqlclient-dev
# mariadb
sudo apt-get install mariadb-server libmariadbclient-dev

sudo apt-get install python-pip python-dev
pip install mysqlclient

登入資料庫
sudo mysql
新增一個資料庫和使用者,並將資料庫的存取權限授權給使用者。
> CREATE DATABASE `djangoDB`;
> CREATE USER 'myuser' IDENTIFIED BY 'mypassword';
> GRANT ALL privileges ON `djangoDB`.* TO 'myuser'@localhost;
> FLUSH PRIVILEGES;'

完成設定後,指令exit即可離開資料庫
用新使用者的身分登入試試看設定是否正確
-p代表要輸入密碼(不加會跳error)
mysql -u myuser -p


二、Django專案設定
請記得剛剛設定的資料庫名稱和使用者帳密
打開settings.py將原本設定的sqlite3修改成mysql
# project/settings.py
DATABASES = {
    'default': {
        'ENGINE': 'django.db.backends.mysql',
        'NAME': 'djangoDB', # DB名稱
        'USER': 'myuser', # 使用者帳號
        'PASSWORD': 'mypassword', # 使用者密碼
        'HOST': 'localhost',
        'PORT': '3306',
        'OPTIONS': {
            'init_command': "SET sql_mode='STRICT_TRANS_TABLES'",
        },
    }
}

option如果沒有設定的話,執行migrate會出現警告 相關資料請見 https://docs.djangoproject.com/en/2.1/ref/databases/#mysql-sql-mode


三、設定生效
設定完成後就可以執行migrate
python manage.py migrate
這時就可以打開資料庫確認table有沒有建好,就大功告成囉!

[Django] 如何使外來鍵指向多個模型


[本文翻譯自Bhrigu Srivastava-Django: How to add ForeignKey to multiple models]
https://medium.com/@bhrigu/django-how-to-add-foreignkey-to-multiple-models-394596f06e84

如何用一個外來鍵(Foreign Key)和1種以上的模型(Model)進行關聯。

先假設你有兩個模型,Article和Post
class Article(models.Model):
    content = models.CharField(max_length=100)
class Post(models.Model):
    content = models.CharField(max_length=100)

現在,我們新增一個Comment的模型,且Article和Post皆與此關聯。因此,我們要如何在Comment中新增一個FK,並指向上述模型中其一。

能達到這功能的概念即為通用關係(Generic Relation),Django包含一種contenttypes的應用,你的模型和content type模型在應用中的關係,能使一個模型物件與任何你建立的模型物件之間啟用通用關係,

Comment模型的格式如下:
from django.contrib.contenttypes.fields import GenericForeignKey
from django.contrib.contenttypes.models import ContentType

class Comment(models.Model):
    comm = models.CharField(max_length=50)
    content_type =   models.ForeignKey(ContentType)
    object_id = models.PositiveIntegerField()
    content_object=GenericForeignKey('content_type', 'object_id')
(建立Generic Relations時,固定加上最後三行)

ContentType是一種模型,一個ContentType的物件儲存了關於專案中的模型資訊,提供方法來回傳他們代表的模型或進行搜尋。

因此,我們能將Comment與任何種類的模型建立關聯,儲存在content_type。(content_type回傳模型種類,object_id回傳此模型物件的id)

接下來,我們新增一個Comment的物件(instance),並將此指向一個Articel物件或Post物件。

將Comment物件指向Articel物件:
>>> art = Article.objects.get(id=1)
>>> c = Comment(content_object=art, comm='asdf')
>>> c.save()
>>> c.content_object
<Post: post1>
將Comment物件指向Post物件:
>>> pos= Post.objects.get(id=1)
>>> c= Comment(content_object=pos, comm='new comment')
>>> c.save()
>>> c.content_object
<Post: post1>

逆向Generic Relations
再來,為了取得所有與Article和Post關聯的Comment物件,我們能利用GenericRelations來達成。在Article和Post中定義一個新的欄位,在你的模型中新增一個欄位來逆向搜尋。
from django.contrib.contenttypes.fields import GenericRelation

class Article(models.Model):
    content = models.CharField(max_length=100)
    comments = GenericRelation(Comment)
class Post(models.Model):
    content = models.CharField(max_length=100)
    comments = GenericRelation(Comment)

接下來,指令model_object.comments.all()會取得所有指向這個Comment物件,舉例:art是一個Article物件;post是一個Post物件。
>>> art.comments.all()
<QuerySet [<Comment: asdf>, <Comment: test>]>
>>> pos.comments.all()
<QuerySet [<Comment: new_comment>, <Comment: test2>]>
以上就是「物件指向多個模型」你所有需要知道的基本使用方式。

請參考The contenttypes framework,能知道更多關於contenttypes的應用。

2018年9月27日 星期四

[Python] 用Selenium訂台鐵車票

首先說明Selenium如何抓到指定的欄位
假設有個HTML原始碼
<input id="my_name" type="text" name="fname"/>
代表可以透過id my_name來填入資料,寫成:
input = browser.find_element_by_xpath("//input[@id='my_name']")
input.send_keys('Amy')

就可以在指定的欄位中填入你的名字
但如果剛好網站不像這樣這麼單純的話
還有一個簡單的方法可以取得xpath

檢視原始碼找到元件,點原始碼按右鍵→Copy→Copy XPath
再到程式碼中填上就可以了


訂購車票程式範例
from selenium import webdriver
from selenium.webdriver.support.ui import Select
from selenium.common.exceptions import NoSuchElementException, WebDriverException
import time

if __name__ == '__main__':
    try:
        browser = webdriver.Chrome()
        browser.get('http://railway.hinet.net/Foreign/TW/etno1.html')

        person_id = browser.find_element_by_xpath("//input[@id='person_id']")
        person_id.send_keys('A123456789') # 身分證字號

        date = browser.find_element_by_xpath("//select[@id='getin_date']")
        date.send_keys('2018/09/27') # 日期

        from_station = Select(browser.find_element_by_id('from_station'))
        from_station.select_by_value('100') # 起站代碼
        to_station = Select(browser.find_element_by_id("to_station"))
        to_station.select_by_value('149') # 到站代碼

        train_no = browser.find_element_by_xpath("//input[@id='train_no']")
        train_no.send_keys('181') # 車次

        browser.find_element_by_css_selector('button.btn.btn-primary').click()

        rand = browser.find_element_by_xpath("//input[@id='randInput']")
        input_str = input('請輸入圖形中的英數字: ') # [!!] 手動輸入圖形驗證碼
        rand.send_keys(input_str)

        browser.find_element_by_css_selector('button.btn.btn-primary').click()

        print('close brower after 10s...')
        time.sleep(10)
        browser.close()
    except NoSuchElementException as e:
        print(e)
    except WebDriverException as e:
        print(e)
其中幾個參數請根據情形修改
(1) 身分證字號
(2) 乘車日期(格式YYYY/MM/DD)
(3) 起站代碼、到站代碼
(4) 車次 代碼請參考
http://railway.hinet.net/Foreign/TW/etno1.html

圖形驗證碼其實就是防止自動程式搶購
因此這部分需要自己看圖輸入答案才會真正完成訂購
雖然如此能自動填寫資料還是可以節省不少時間
程式未針對資料錯誤進行防呆(像是車次不存在、代碼填錯)
資料正確的情況下都能成功訂購一般車次

如果是普悠瑪的話
因為還要填人數所以不太一樣
需要的話記得要修改一下才適用

2018年8月23日 星期四

[Python] Selenium操作Firefox


安裝selenium
pip install selenium==3.14.0

安裝geckodriver
# 取得合適的版本
wget https://github.com/mozilla/geckodriver/releases/download/v0.21.0/geckodriver-v0.21.0-linux64.tar.gz
# 解壓縮
tar zxvf geckodriver-v0.21.0-linux64.tar.gz
sudo mv geckodriver /usr/bin

設定firefox環境參數
export DISPLAY=:0.0

現在可以來測試selenium效果,打開瀏覽器到google,截圖後存檔。若執行成功應該會在同一目錄下產生google擷取畫面。
from selenium import webdriver
browser = webdriver.Firefox()
browser.get('https://www.google.com')
browser.save_screenshot('screenshot_google.png')
browser.close()

2018年3月21日 星期三

[django] django-widget-tweaks 設定Form widget套件

請擇一方式完成django-widget-tweaks安裝
[方法一] pip
# 利用pip安裝
pip install django-widget-tweaks

[方法二] 原始碼安裝
# 選定安裝的版本,將原始碼下載到當前目錄
wget --no-check-certificate https://github.com/jazzband/django-widget-tweaks/archive/1.4.2.tar.gz
# 解壓縮
tar zvxf 1.4.2.tar.gz
cd django-widget-tweaks-1.4.2/
python setup.py install

完成安裝後,使用套件要在settings.py裡面include
# project/settings.py
INSTALLED_APPS = (
    ...
    'widget_tweaks',
)

在Template裡面可以這樣設定,這邊套用了bootstrap的form style。
# templates/index.html
{% load widget_tweaks %}

<form method="post">
  {% csrf_token %}
  {% for field in form %}<br />
    <div class="form-group">
      <label for="{{ field.id_for_label }}">{{ field.label }} :</label>
      {% render_field field placeholder=field.help_text class+="form-control" %}
    </div>
  {% endfor %}
  <button class="btn btn-primary" type="sumbit">儲存</button>
</form>

其他的運用方式,可以參考 這裡,了解更多!

參考資料:
https://github.com/jazzband/django-widget-tweaks

2018年3月13日 星期二

[Python] Virtualenv基本操作

使用pip安裝virtualenv
# install virtualenv
sudo pip install virtualenv
開發Djagno專案,常搭配virtualenv使用,能透過virtualenv創造虛擬環境,在啟動虛擬環境的情況下,pip所安裝的套件只存在虛擬環境中,使得專案可以互相獨立,因此不同的專案可以安裝不同版本的使用套件。

建立新的虛擬環境
# move to your project
cd [myproject]
# add virtualenv
virtualenv [projectenv]

啟動虛擬環境
# active your virtualenv
source [projectenv]/bin/activate
在command line前面出現 (projectenv),代表啟動成功,即可安裝所需的套件。

關閉虛擬環境
# close your virtualenv
deactivate

2018年2月23日 星期五

[Django] 重設admin密碼

如果忘記django user的密碼的重設方式 先開啟 python shell
python manage.py shell
指定要修改的帳號,set_password中填入新密碼
# import User first
from django.contrib.auth.models import User

# reset password
user = User.objects.get(username='root') user.set_password('newpassword')
user.save()
如果忘記帳號的查詢方式
# list superuser
User.objects.filter(is_superuser=True)

# list all user
User.objects.all()
找到帳號後再用剛剛的方式重設密碼即可

2018年1月28日 星期日

[Django] REST framework

首先必須安裝rest framework
# install django rest framework
pip install djangorestframework
在settings.py加上rest_framework
# project/settings.py
INSTALLED_APPS = (
    ...
    'app',
    'rest_framework',
)
準備資料表
# app/models.py
from django.db import models
def Participant():
    name = models.CharField(max_length=20)
    age = models.DecimalField(max_digits=3,decimal_places=0)
    GENDER = (
        ('F', 'Female'),
        ('M', 'Male'),
    )
    gender = models.CharField(max_length=1, choices=GENDER)

初始資料表或更新時,執行makemigrations產生model.py的資料庫語言,執行migrate則會根據這份文件去建立/修改資料表。shell指令則是進入Python的互動模式去操作資料庫。
# active model
python manage.py makemigrations
python manage.py migrate

# execute python shell
python manage.py shell
# (Python Shell)add a new record in Participant
Python 3.5.2 (default, Nov 23 2017, 16:37:01)
[GCC 5.4.0 20160609] on linux
Type "help", "copyright", "credits" or "license" for more information.
(InteractiveConsole)
>>> from app.models import Participant
>>> record = Participant(name='Mike', age='20', gender='M')
>>> record.save()
serializers.py
# app/serializers.py
from rest_framework import serializers
from app.models import Participant

class ParticipantSerializer(serializers.HyperlinkedModelSerializer):
    class Meta:
        model = Participant
        fields = ('url', 'name', 'age', 'gender')
views.py
# app/views.py
from rest_framework import viewsets
from app.models import Participant
from app.serializers import ParticipantSerializer

class ParticipantViewSet(viewsets.ModelViewSet):
    queryset = Participant.objects.all()
    serializer_class = ParticipantSerializer
url.py
# project/url.py
from django.conf.urls import url, include
from rest_framework import routers
from app.views import ParticipantViewSet

router = routers.DefaultRouter()
router.register(r'participants', ParticipantViewSet)

# Wire up our API using automatic URL routing.
# Additionally, we include login URLs for the browsable API.
urlpatterns = [
    ...
    url(r'^api/', include(router.urls)),
    url(r'^api/api-auth/', include('rest_framework.urls', namespace='rest_framework'))
]

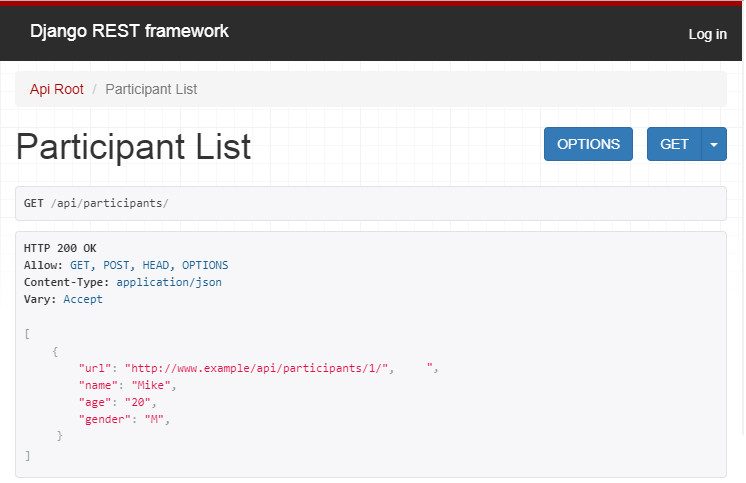
接著就可以在瀏覽器上確認API有沒有正常運作。

URL- http://www.example.com.tw/api/

URL- http://www.example.com.tw/api/participants/


URL- http://www.example.com.tw/api/participants/1/

我們能夠透過設定權限,防止資料被任意串改,在登入的情況下才能新增/修改/刪除,其他僅能取得資料。
# app/views.py
class ParticipantViewSet(viewsets.ModelViewSet):
    queryset = Participant.objects.all()
    serializer_class = ParticipantSerializer
    permission_classes = (permissions.IsAuthenticatedOrReadOnly)
或是
# app/views.py
class ParticipantViewSet(viewsets.ReadOnlyModelViewSet):
    queryset = Participant.objects.all()
    serializer_class = ParticipantSerializer

URL- http://www.example.com.tw/api/api-auth/login/
右上角點選「Log in」,輸入帳密後才有修改的權限。


參考資料:
http://www.django-rest-framework.org/tutorial/quickstart/

2017年10月19日 星期四

[Django] Invalid HTTP_HOST header


遠端建立Django專案,無法在顯示自己的瀏覽器顯示畫面的解決方式。

DisallowedHost at /
Invalid HTTP_HOST header

Request Method: GET
Request URL: http://www.example.com/
Exception Type: DisallowedHost


解決方式:
打開/your project/blog/setting.py找到ALLOWED_HOSTS加上IP address
# /your project/blog/setting.py
ALLOWED_HOSTS = ['www.example.com', 'localhost', '127.0.0.1']

執行方式:
python manage.py runserver 0:8000


在瀏覽器開啟 http://www.example.com:8000
即可正常顯示