2018年3月21日 星期三

[django] django-widget-tweaks 設定Form widget套件

請擇一方式完成django-widget-tweaks安裝
[方法一] pip
# 利用pip安裝
pip install django-widget-tweaks

[方法二] 原始碼安裝
# 選定安裝的版本,將原始碼下載到當前目錄
wget --no-check-certificate https://github.com/jazzband/django-widget-tweaks/archive/1.4.2.tar.gz
# 解壓縮
tar zvxf 1.4.2.tar.gz
cd django-widget-tweaks-1.4.2/
python setup.py install

完成安裝後,使用套件要在settings.py裡面include
# project/settings.py
INSTALLED_APPS = (
    ...
    'widget_tweaks',
)

在Template裡面可以這樣設定,這邊套用了bootstrap的form style。
# templates/index.html
{% load widget_tweaks %}

<form method="post">
  {% csrf_token %}
  {% for field in form %}<br />
    <div class="form-group">
      <label for="{{ field.id_for_label }}">{{ field.label }} :</label>
      {% render_field field placeholder=field.help_text class+="form-control" %}
    </div>
  {% endfor %}
  <button class="btn btn-primary" type="sumbit">儲存</button>
</form>

其他的運用方式,可以參考 這裡,了解更多!

參考資料:
https://github.com/jazzband/django-widget-tweaks

2018年3月13日 星期二

[HTML] 上傳媒體(圖片、影片、聲音)

透過accept這個attr來設定上傳檔案的類型,以及資料來源,可用手機測試實作效果。
<input accept="video/*;capture=camcorder" />
<input accept="audio/*;capture=microphone" />
<input accept="image/*" /> 限制檔案為影像
<input accept="image/*;capture=camera" /> 限制檔案為影像,資料來源為相機
<input accept="image/*" multiple="" type="file" />


[Python] Virtualenv基本操作

使用pip安裝virtualenv
# install virtualenv
sudo pip install virtualenv
開發Djagno專案,常搭配virtualenv使用,能透過virtualenv創造虛擬環境,在啟動虛擬環境的情況下,pip所安裝的套件只存在虛擬環境中,使得專案可以互相獨立,因此不同的專案可以安裝不同版本的使用套件。

建立新的虛擬環境
# move to your project
cd [myproject]
# add virtualenv
virtualenv [projectenv]

啟動虛擬環境
# active your virtualenv
source [projectenv]/bin/activate
在command line前面出現 (projectenv),代表啟動成功,即可安裝所需的套件。

關閉虛擬環境
# close your virtualenv
deactivate

2018年2月23日 星期五

[Django] 重設admin密碼

如果忘記django user的密碼的重設方式 先開啟 python shell
python manage.py shell
指定要修改的帳號,set_password中填入新密碼
# import User first
from django.contrib.auth.models import User

# reset password
user = User.objects.get(username='root') user.set_password('newpassword')
user.save()
如果忘記帳號的查詢方式
# list superuser
User.objects.filter(is_superuser=True)

# list all user
User.objects.all()
找到帳號後再用剛剛的方式重設密碼即可

2018年1月28日 星期日

[Django] REST framework

首先必須安裝rest framework
# install django rest framework
pip install djangorestframework
在settings.py加上rest_framework
# project/settings.py
INSTALLED_APPS = (
    ...
    'app',
    'rest_framework',
)
準備資料表
# app/models.py
from django.db import models
def Participant():
    name = models.CharField(max_length=20)
    age = models.DecimalField(max_digits=3,decimal_places=0)
    GENDER = (
        ('F', 'Female'),
        ('M', 'Male'),
    )
    gender = models.CharField(max_length=1, choices=GENDER)

初始資料表或更新時,執行makemigrations產生model.py的資料庫語言,執行migrate則會根據這份文件去建立/修改資料表。shell指令則是進入Python的互動模式去操作資料庫。
# active model
python manage.py makemigrations
python manage.py migrate

# execute python shell
python manage.py shell
# (Python Shell)add a new record in Participant
Python 3.5.2 (default, Nov 23 2017, 16:37:01)
[GCC 5.4.0 20160609] on linux
Type "help", "copyright", "credits" or "license" for more information.
(InteractiveConsole)
>>> from app.models import Participant
>>> record = Participant(name='Mike', age='20', gender='M')
>>> record.save()
serializers.py
# app/serializers.py
from rest_framework import serializers
from app.models import Participant

class ParticipantSerializer(serializers.HyperlinkedModelSerializer):
    class Meta:
        model = Participant
        fields = ('url', 'name', 'age', 'gender')
views.py
# app/views.py
from rest_framework import viewsets
from app.models import Participant
from app.serializers import ParticipantSerializer

class ParticipantViewSet(viewsets.ModelViewSet):
    queryset = Participant.objects.all()
    serializer_class = ParticipantSerializer
url.py
# project/url.py
from django.conf.urls import url, include
from rest_framework import routers
from app.views import ParticipantViewSet

router = routers.DefaultRouter()
router.register(r'participants', ParticipantViewSet)

# Wire up our API using automatic URL routing.
# Additionally, we include login URLs for the browsable API.
urlpatterns = [
    ...
    url(r'^api/', include(router.urls)),
    url(r'^api/api-auth/', include('rest_framework.urls', namespace='rest_framework'))
]

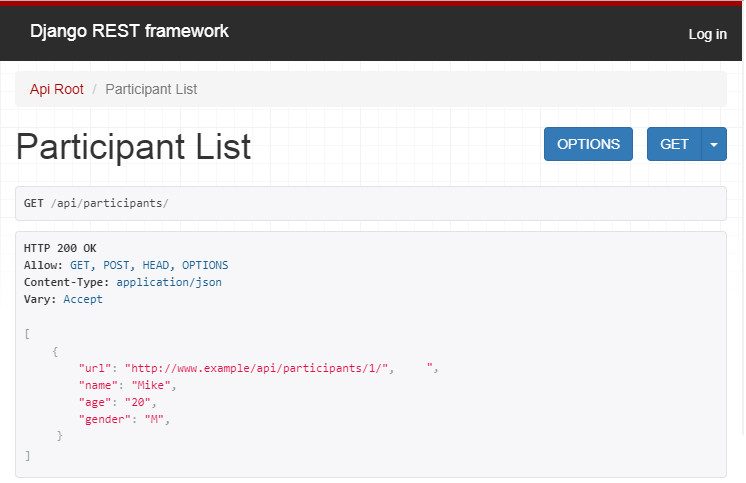
接著就可以在瀏覽器上確認API有沒有正常運作。

URL- http://www.example.com.tw/api/

URL- http://www.example.com.tw/api/participants/


URL- http://www.example.com.tw/api/participants/1/

我們能夠透過設定權限,防止資料被任意串改,在登入的情況下才能新增/修改/刪除,其他僅能取得資料。
# app/views.py
class ParticipantViewSet(viewsets.ModelViewSet):
    queryset = Participant.objects.all()
    serializer_class = ParticipantSerializer
    permission_classes = (permissions.IsAuthenticatedOrReadOnly)
或是
# app/views.py
class ParticipantViewSet(viewsets.ReadOnlyModelViewSet):
    queryset = Participant.objects.all()
    serializer_class = ParticipantSerializer

URL- http://www.example.com.tw/api/api-auth/login/
右上角點選「Log in」,輸入帳密後才有修改的權限。


參考資料:
http://www.django-rest-framework.org/tutorial/quickstart/

[Sublime] SFTP同步遠端資料夾

使用Sublime[官網]可以很輕鬆地和遠端伺服器的資料夾同步,
首先記得下載Sublime SFTP的套件[下載]。

除了到官方網站下載,另外也可以透過sublime的內建指令安裝。
最後搜尋SFTP即可完成安裝!


操作方法如下:
1. 在本地端(也就是你的電腦)新增一個資料夾,我命名為myProject,之後從遠端下載資料後要放的資料夾,打開sublime後,按「Open Folder」,並選擇剛剛新增的資料夾。

選擇的資料夾 myProject,將會出現在底下。


2. 在資料夾名稱點選右鍵,選擇「SFTP/FTP」→「Map to Remote」

此時會自動產生一個 sftp-config.json的檔案,

3. 編輯sftp-config.json,請根據遠端伺服器的資料填寫,也可以選擇使用password或key登入,port若不設定,就是根據連線方式(type)設定成default port number。
{
    "upload_on_save": true,                /* 儲存後自動同步到遠端伺服器*/
    "type": "sftp",                        /* sftp, ftp or ftps */
   
    "host": "example.com",                 /* server */
    "user": "username",                    /* 帳號 */
    //"password": "password",              /* 密碼 */
    //"port": "22",                        /* 埠號 */

    "remote_path": "/example/path/",       /* 遠端伺服器同步資料夾 */

    //"ssh_key_file": "~/.ssh/id_rsa",     /* 使用金鑰 */
}


4. 完成後存檔,並在資料夾名稱按右鍵,選擇「Download Folder」或是「Sync Remote->Local」,底下看到console會開始與遠端伺服器連線,下載檔案。


相關文章:
[Sublime] SFTP參數說明


參考資料:
Sublime Text 加入 FTP 資料夾
[Sublime Text] 使用 SFTP 套件自動同步本地/遠端檔案

2017年12月22日 星期五

[Javascript] iOS創建時間格式


在網頁中實作倒數計時器時,iOS的瀏覽器無法正確顯示數字,而是回傳了NaN的字串,這是因為iOS和Android手機的時間格式不同。

一般在Android輸入 2017-01-02 08:10:25 就可以讀取,但iOS瀏覽器的格式卻是 2017, 1, 2, 8, 10, 25,可以用下列方法取代原本的格式,而且不只iOS手機可以適用,Android手機也能正常顯示!

var tmp='2017-01-02 08:10:25'.split(/[- : \/]/);
var time = new Date(tmp[0], tmp[1]-1, tmp[2], tmp[3], tmp[4], tmp[5]);
document.write(time);


實作數計時器時,只要取得現在的時間和目標時間,兩者相減得到毫秒(ms),在轉換成相應的天數、小時、分、秒。

var tmp='2017-01-02 08:10:25'.split(/[- : \/]/);
var time = new Date(tmp[0], tmp[1]-1, tmp[2], tmp[3], tmp[4], tmp[5]);
var current = new Date();
var left_time = time - current;

[LINE] 使用POSTMAN設定Line Notify


Postman

(1) 連動取得ACCESS_TOKEN


(2) 傳送訊息

Method Post
Request URL  https://notify-api.line.me/api/notify
Header  Key=Authorization, Value='Bearer '+{ACCESS_TOKEN}
Body  Key=Message, Value={YOUR_MESSAGE}


假設取得的Access token是ABCDE,要注意 Authorization的value是'Bearer ABCDE',前面記得加上Bearer,用一個空白隔開再加上Access token。

設定完成按下[Send]

如果得到200的Response,代表成功發送訊息囉!


2017年10月20日 星期五

[SSH] 使用金鑰連線Google Cloud Platform主機


使用Good Cloud Platform進行開發
除了提供瀏覽器進行SSH連線 也可以用PUTTY、Notepad++ Nppftp及FileZila遠端連線

記得先把公開金鑰(public key)加入


 (1) Notepad++

 [step1.] 填寫Hostname

[step2. ] 選擇認證方式(private key)和檔案

金鑰格式支援 [pem]

Puttygen產生的金鑰格視為ppk
如何將ppk轉為pem可以參考
https://stackoverflow.com/questions/33273180/create-a-pem-from-a-ppk-file
# install PuttyTools
sudo apt-get install putty-tools
puttygen server.ppk -O private-openssh -o server.pem


(2) FileZila

選擇[File] -> [Site Manager],填寫Hostname等資料
欄位Logon Type為[Key file],在欄位Key file選擇你的私人金鑰

金鑰格式支援 [ppk] [pem]


2017年10月19日 星期四

[Django] Invalid HTTP_HOST header


遠端建立Django專案,無法在顯示自己的瀏覽器顯示畫面的解決方式。

DisallowedHost at /
Invalid HTTP_HOST header

Request Method: GET
Request URL: http://www.example.com/
Exception Type: DisallowedHost


解決方式:
打開/your project/blog/setting.py找到ALLOWED_HOSTS加上IP address
# /your project/blog/setting.py
ALLOWED_HOSTS = ['www.example.com', 'localhost', '127.0.0.1']

執行方式:
python manage.py runserver 0:8000


在瀏覽器開啟 http://www.example.com:8000
即可正常顯示